AWS ECS Fargate install guide
Buzzy server containers can be deployed into AWS Elastic Container Services (ECS) using AWS console or AWS CLI access. This guide explains the deployment steps using AWS console.
Table of contents
- Deployment architecture
- Server deployment components
- Prerequisites
- AWS services required
- Buzzy Server images in Docker Registry
- Create ECS cluster
- Create ECS Task Definitions
- Create NAT instance or AWS NAT Gateway
- Deploy an Application Load Balancer
- Create Buzzy ECS services
- Create DNS records in Route 53
- How to view Logs
- S3 Bucket configuration
Deployment architecture
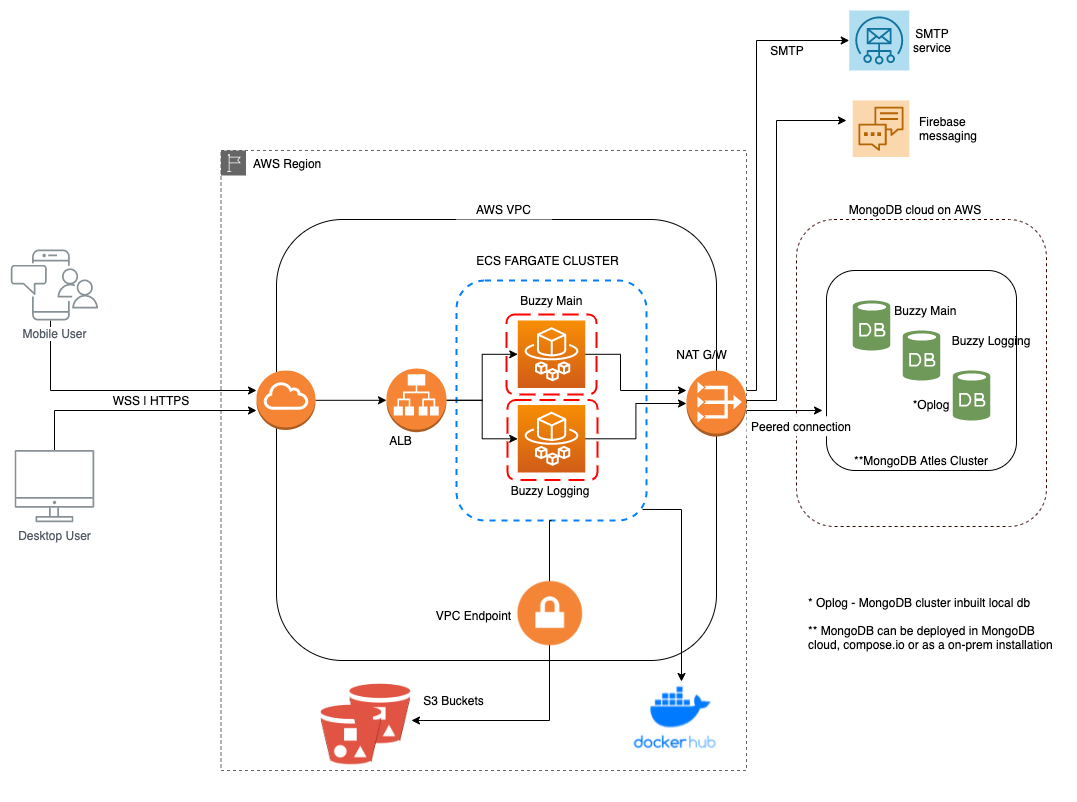
Server deployment components
- Buzzy server container
- Logging server container
- DB in MongoDB Atlas cloud
- Two AWS S3 buckets
- Application Load Balancer (ALB)
- SMTP service
- DNS service
- SSL certificates
Prerequisites
- AWS CLI access is configured
- Has access to Buzzy images at Docker hub
- MongoDB cluster is created
- Two S3 buckets created – refer the section below
- Domain names and SSL certificate for Buzzy main and logging apps
AWS services required
Configure AWS access profile using $ aws configure command with the Access Key ID and Secret Access Key.
AWS services involved with this deployment are;
- Virtual Private Cloud (VPC)
- Two Private Subnets and Two Public Subnets
- Three Security Groups
- AWS CLI
- S3 buckets
- AWS ECS Cluster
- Application Load Balancer
- NAT instance or NAT Gateway for egress traffic
- Route 53
- IAM
- Certificate Manager
Buzzy Server images in Docker Registry
Buzzy provides two server images via Docker Hub. Buzzy team will provide access details to the private registry so that image pulling into ECS can be configured using ECS Task Definition for each servers.
Refer to AWS documentation on on Private registry authentication for tasks
Create ECS cluster
Go to AWS ECS console and Create an ECS cluster on a VPC with two subnets and a Security Group allowing inbound traffic on port 80. You may create the load balancer to forward https traffic to running container tasks as described in below sections.
Create ECS Task Definitions
The deployment mechanism in ECS Fargate is built around Task Definitions which contain the runtime settings for running containers as an ECS Service in an ECS cluster. A new deployment consists of publishing a new task definition and then pointing the ECS service to use that new version. A task definition contains docker image settings, CPU/RAM settings, IAM roles and some environment settings. Buzzy deployment requires MongoDB connection URLs, Meteor settings and other few mandetory settings to pass as environment variables in the Task Definition. Please reach Buzzy team to add support with building the Task Definition. You will build two Task Definitions for Buzzy Main server and Logging server. Go to TASK Definition section in the AWS ECS console and create Task Definitions. You may use Task Builder or JSON configuration file to create the Task Definitions.
Create IAM Policies and Roles
ECS Task Role called ecsTaskExecutionRole in AWS IAM will be automatically created when creating ECS Tasks. Once ecsTaskExecutionRole is created, go to IAM console and attach the IAM policy which was already created when you setup access to Docker regitry.
Refer to AWS documentation
Create and Run Buzzy Main Task Definition
Refer to sample values provided in the JSON document below.
{
  "executionRoleArn": "arn:aws:iam::XYZ.......:role/ecsTaskExecutionRole",
  "containerDefinitions": [
    {
      "portMappings": [
        {
          "hostPort": 8080,
          "protocol": "tcp",
          "containerPort": 8080
        }
      ],
      "environment": [
        {
          "name": "LOG_TO_STDOUT",
          "value": "1"
        },
        {
          "name": "METEOR_SETTINGS",
          "value": "<Add METEOR configuration values from buzzy app configuration file using json format>"
        },
        {
          "name": "MONGO_URL",
          "value": "<URL>"
        },
        {
          "name": "PORT",
          "value": "8080"
        },
        {
          "name": "ROOT_URL",
          "value": "<URL>"
        }
      ],
      "image": "<AWS accountId>.dkr.ecr.<region>.amazonaws.com/<docker image name>:<image label>",
      "name": "buzzy_logg"
    }
  ],
  "memory": "1024",
  "compatibilities": [
    "EC2",
    "FARGATE"
  ],
  "networkMode": "awsvpc",
  "cpu": "512",
}
Create and Run Buzzy Logging Task Definition
Refer to sample values provided in the JSON document below.
{
  "executionRoleArn": "arn:aws:iam::XYZ.........:role/ecsTaskExecutionRole",
  "containerDefinitions": [
    {
      "portMappings": [
          {
            "hostPort": 8080,
            "protocol": "tcp",
            "containerPort": 8080
          }
      ],
      "environment": [
        {
          "name": "LOG_TO_STDOUT",
          "value": "1"
        },
        {
          "name": "METEOR_SETTINGS",
          "value": "{"public": {"BUZZY_LOGGING_SERVER":"<Server URL>", "BUZZY_APP_SERVER": "<Server URL>" } }"
        },
        {
          "name": "MONGO_URL",
          "value": "<Cluster Endpoint URL>"
        },
        {
          "name": "PORT",
          "value": "8080"
        },
        {
          "name": "ROOT_URL",
          "value": "<URL>"
        }
      ],
      "image": "<AWS accountId>.dkr.ecr.<region>.amazonaws.com/<docker image name>:<image label>",
      "name": "buzzy_logg"
    }
  ],
  "memory": "1024",
  "compatibilities": [
    "EC2",
    "FARGATE"
  ],
  "networkMode": "awsvpc",
  "cpu": "512",
}
Create NAT instance or AWS NAT Gateway
NAT is required to establish egress(outbound only) traffic when you create ECS Fargate tasks on private subnets. Refer to AWS documentation
Deploy an Application Load Balancer
AWS ALB act as a forward proxy which is required to forward traffic received to ECS cluster.
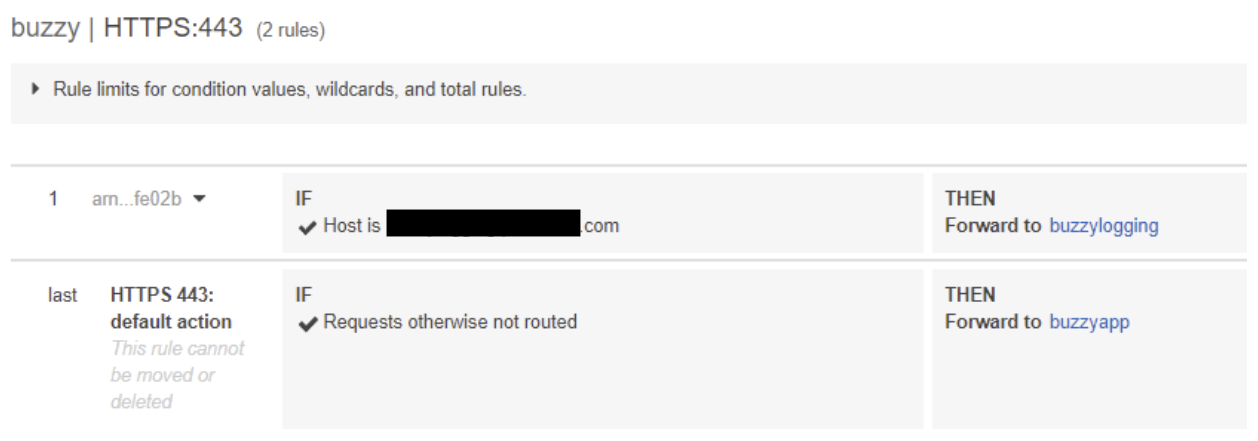
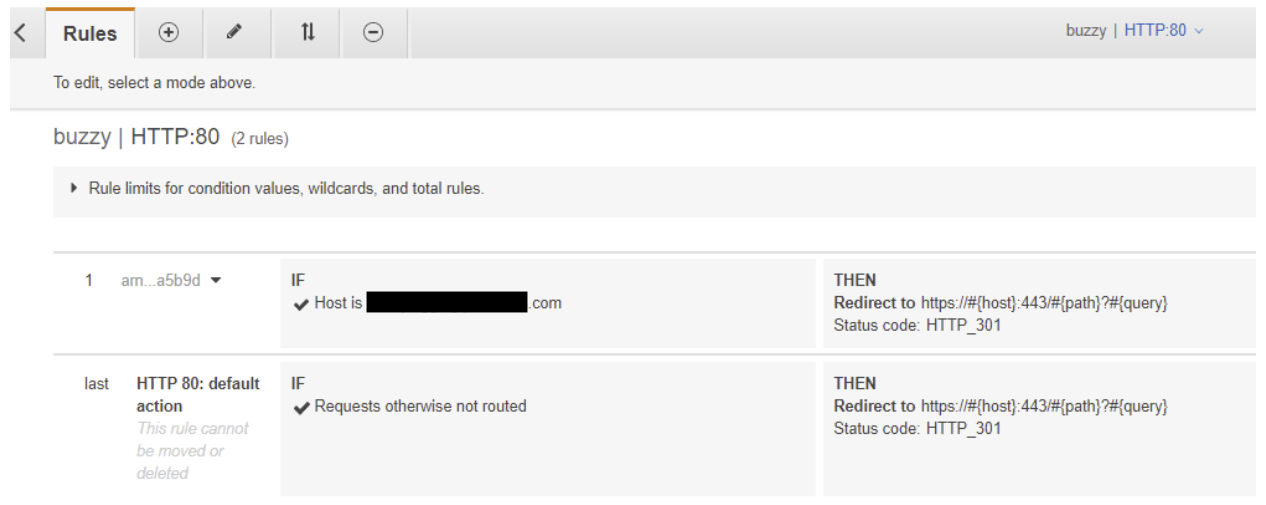
HTTPS listener has a dependency with SSL certificate which can be created using AWS Certificate Manager and then assign to the listener. When you create ECS services, create two Target Groups for Buzzy main and Buzzy Logging servers. Create rules on both listeners forwarding traffic to relevant target groups. You may also add https redirect rule on HTTP listener so that application access will be always on HTTPS.
HTTPS listener rules
HTTP listener rules
Create Buzzy ECS services
Create two ECS Fargate services using Tasks created above. Select the VPC, Subnets, Fargate type, Security and Application Load Balancer when you create services. Two Load Balancer target groups should be created when you deploy two services.
Create DNS records in Route 53
Add two subdomain names decoded previously to Route53 creating A records as Alias for Load balancer’s DNS name. DNS propagation may take a few minutes and you may test both Buzzy main and logging URLs on the browser to confirm the loading of both services.
How to view Logs
Use CloudWatch Groups to view server/application logs. You can enable container insight for ECS Fargate perfromnace logs and view them via CloudWatch.
S3 Bucket configuration
Introduction
Buzzy Server deployment requires two S3 buckets, one for public content and one for private/secure content. Select unique names of two buckets and include them in to the METOR configuration of the ECS Fargate Task Definition. The ‘access key ID’ and ’secret access key’ should be obtained from your AWS IAM accounts associated with the S3 buckets and make to include IAM credentials in METEOR settings of ECS Fargate Task Definition. You may choose to use Parameter Store as a secure store of IAM secrets so that secrets are not directly included in the Task Definition parameters (more details - https://amzn.to/35Pe7iM).
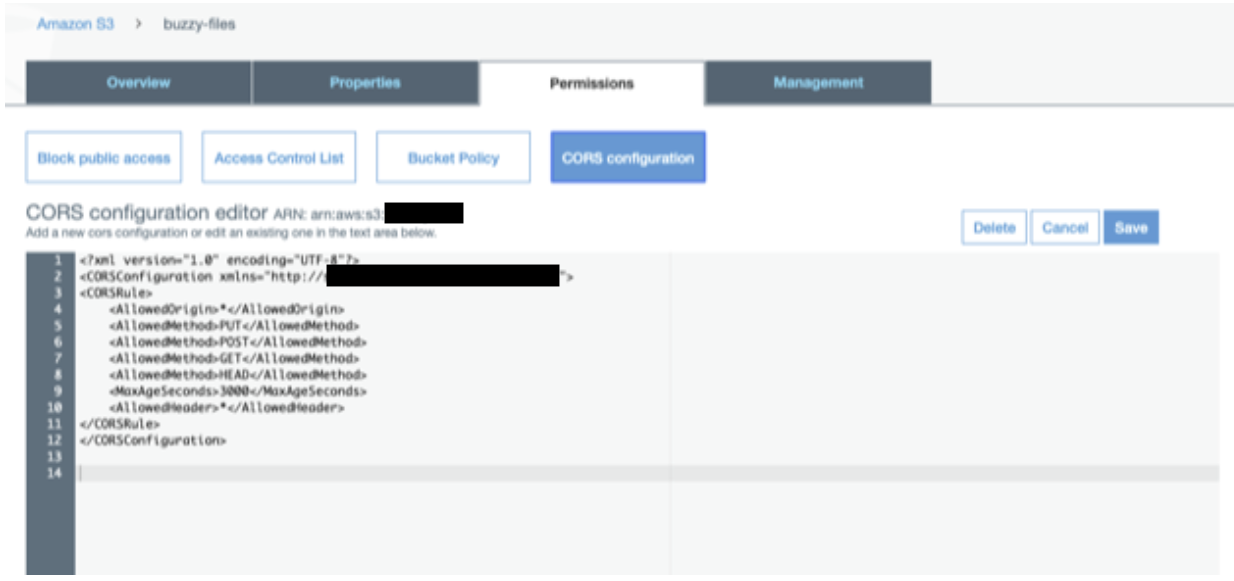
Setup CORS configuration on buckets so that the browser or phone can upload directly to it with a SIGNED URL without depending on Buzzy servers. Once created, follow instructions below to update the configuration on each S3 buckets.
AWS S3 private bucket
This bucket does not have public access (make sure to block public access and access to every one group) and uses secure signed URLs to upload and access files.
Add CORES configuration
[
    {
        "AllowedHeaders": [
            "*"
        ],
        "AllowedMethods": [
            "PUT",
            "POST",
            "GET",
            "HEAD"
        ],
        "AllowedOrigins": [
            "*"
        ],
        "ExposeHeaders": [],
        "MaxAgeSeconds": 3000
    }
]
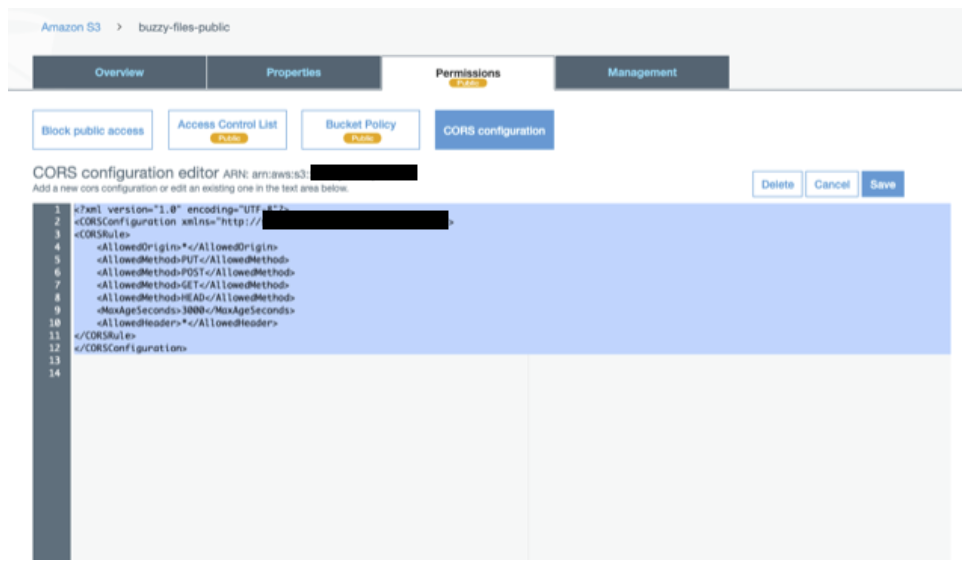
AWS S3 public bucket
This bucket is used for files that need public access.
Add CORES configuration
[
    {
        "AllowedHeaders": [
            "*"
        ],
        "AllowedMethods": [
            "PUT",
            "POST",
            "GET",
            "HEAD"
        ],
        "AllowedOrigins": [
            "*"
        ],
        "ExposeHeaders": [],
        "MaxAgeSeconds": 3000
    }
]
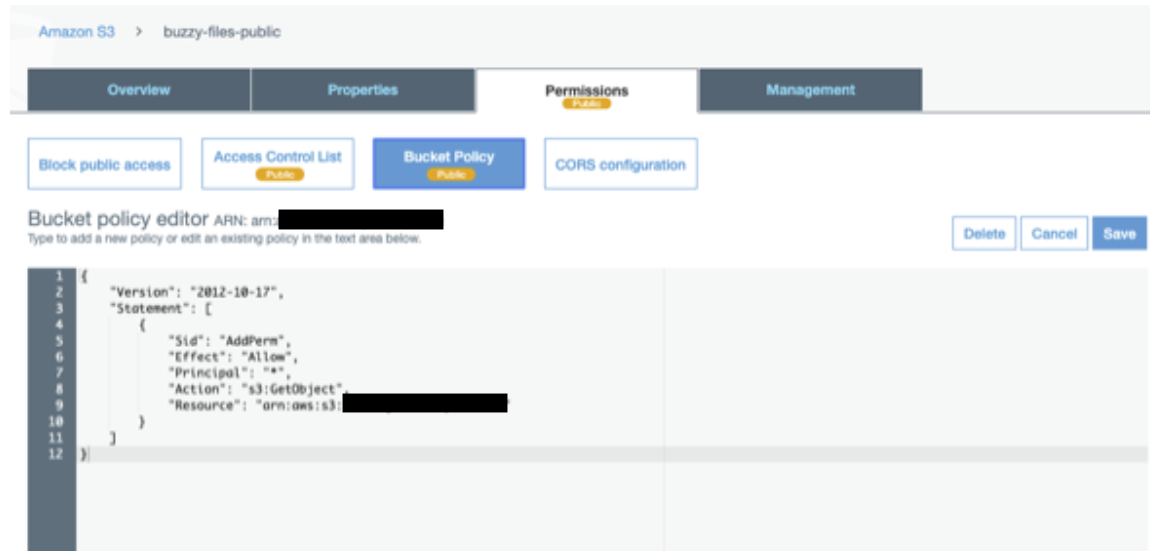
Add S3 bucket policy
{
  "Version": "2012-10-17",
  "Statement": [
    {
      "Sid": "AddPerm",
      "Effect": "Allow",
      "Principal": "*",
      "Action": "s3:GetObject",
      "Resource": "arn:aws:s3:::<public bucket name>/*"
    }
  ]
}
Adding bucket details and access credentials
Edit METEOR_SETTINGS.AWS_BUZZY_FILES
"AWS_BUZZY_FILES": {
  "enabled": true,
  "accessKeyId": “<access key ID>",
  "secretAccessKey": “<secret>",
  "BUCKET_NAME": "<bucket name>",
  "PUBLIC_BUCKET_NAME": "<public bucket name>",
  "S3_REGION": "us-east-1"
},
Edit METEOR_SETTINGS.public.AWS_BUZZY_FILES
"AWS_BUZZY_FILES": {
  "enabled": true,
  "S3FileExpiry": 604800,
  "BUCKET_NAME": "<bucket name>",
  "URL_PATTERN": "s3-<region>.amazonaws.com"
},