Create your first Microapp (Legacy)
Table of contents
Part 1: Creating your first app.
Open Buzzy. You will see any apps that you already have access to.
Click the hamburger symbol  in the top left of the screen this opens the options view then select Templates
You will now see any templates that are provided with Buzzy. Buzzy is such a flexible product and can be utilised for many use cases, but this flexibility may be off putting to first time users, to assist people to get started quickly templates are provided across many industries. Templates are a good kick off point for you or your clients to build their app from. The templates are not going to provide a complete out of the box solution but they make building apps quicker for standard use cases, it may be easier initially to amend a template than building straight from scratch.
If you want to build an app from scratch there is a recommended methodology that will help you build prototypes and completed solutions quickly. That methodology is Design Thinking.
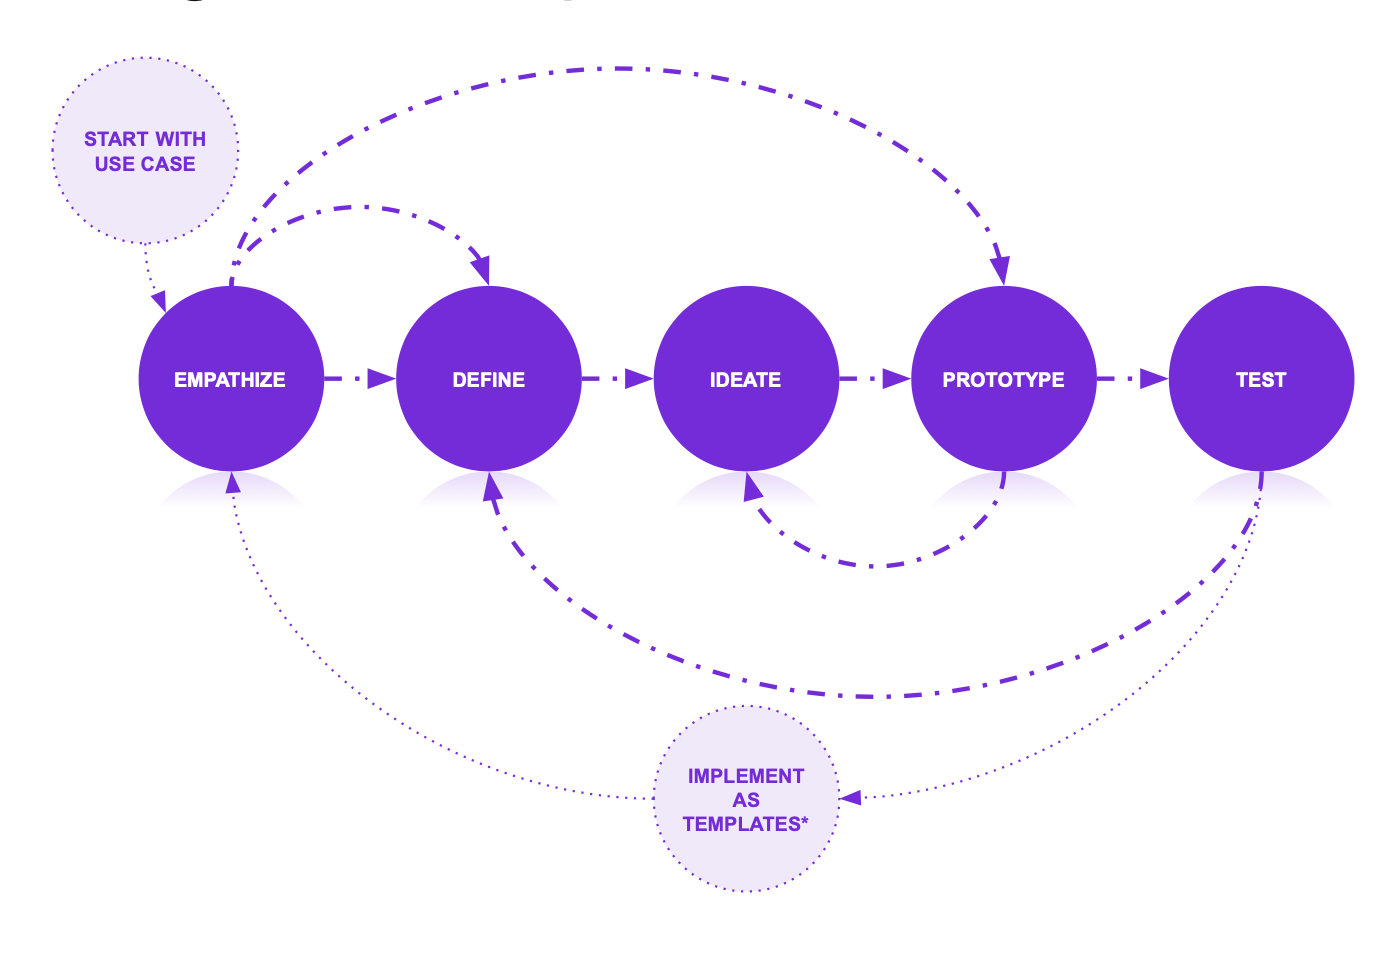
Design Thinking tackles complex problems by:
- Empathising: Understanding the human needs involved.
- Defining: Re-framing and defining the problem in human-centric ways.
- Ideating: Creating many ideas in ideation sessions.
- Prototyping: Adopting a hands-on approach in prototyping.
- Testing: Developing a prototype/solution to the problem.
Using the Design Thinking methodology means we can build prototypes very quickly. So lets start with a problem:
A rural homeowner wants to make an insurance claim after a flood event - a claims adjuster will need to visit the property and will need to record additional information on site, despite a lack of reliable data connection.
A solution to this problem could be:
An offline-capable app that would allow policy holders to report claims and the adjuster to prepare for the site visit and capture vital information while there, including location data, images and more. Data is synced as soon as a connection is re-established, and the claim can be processed.
We can now build a flow of information and the various characters involved in the process.
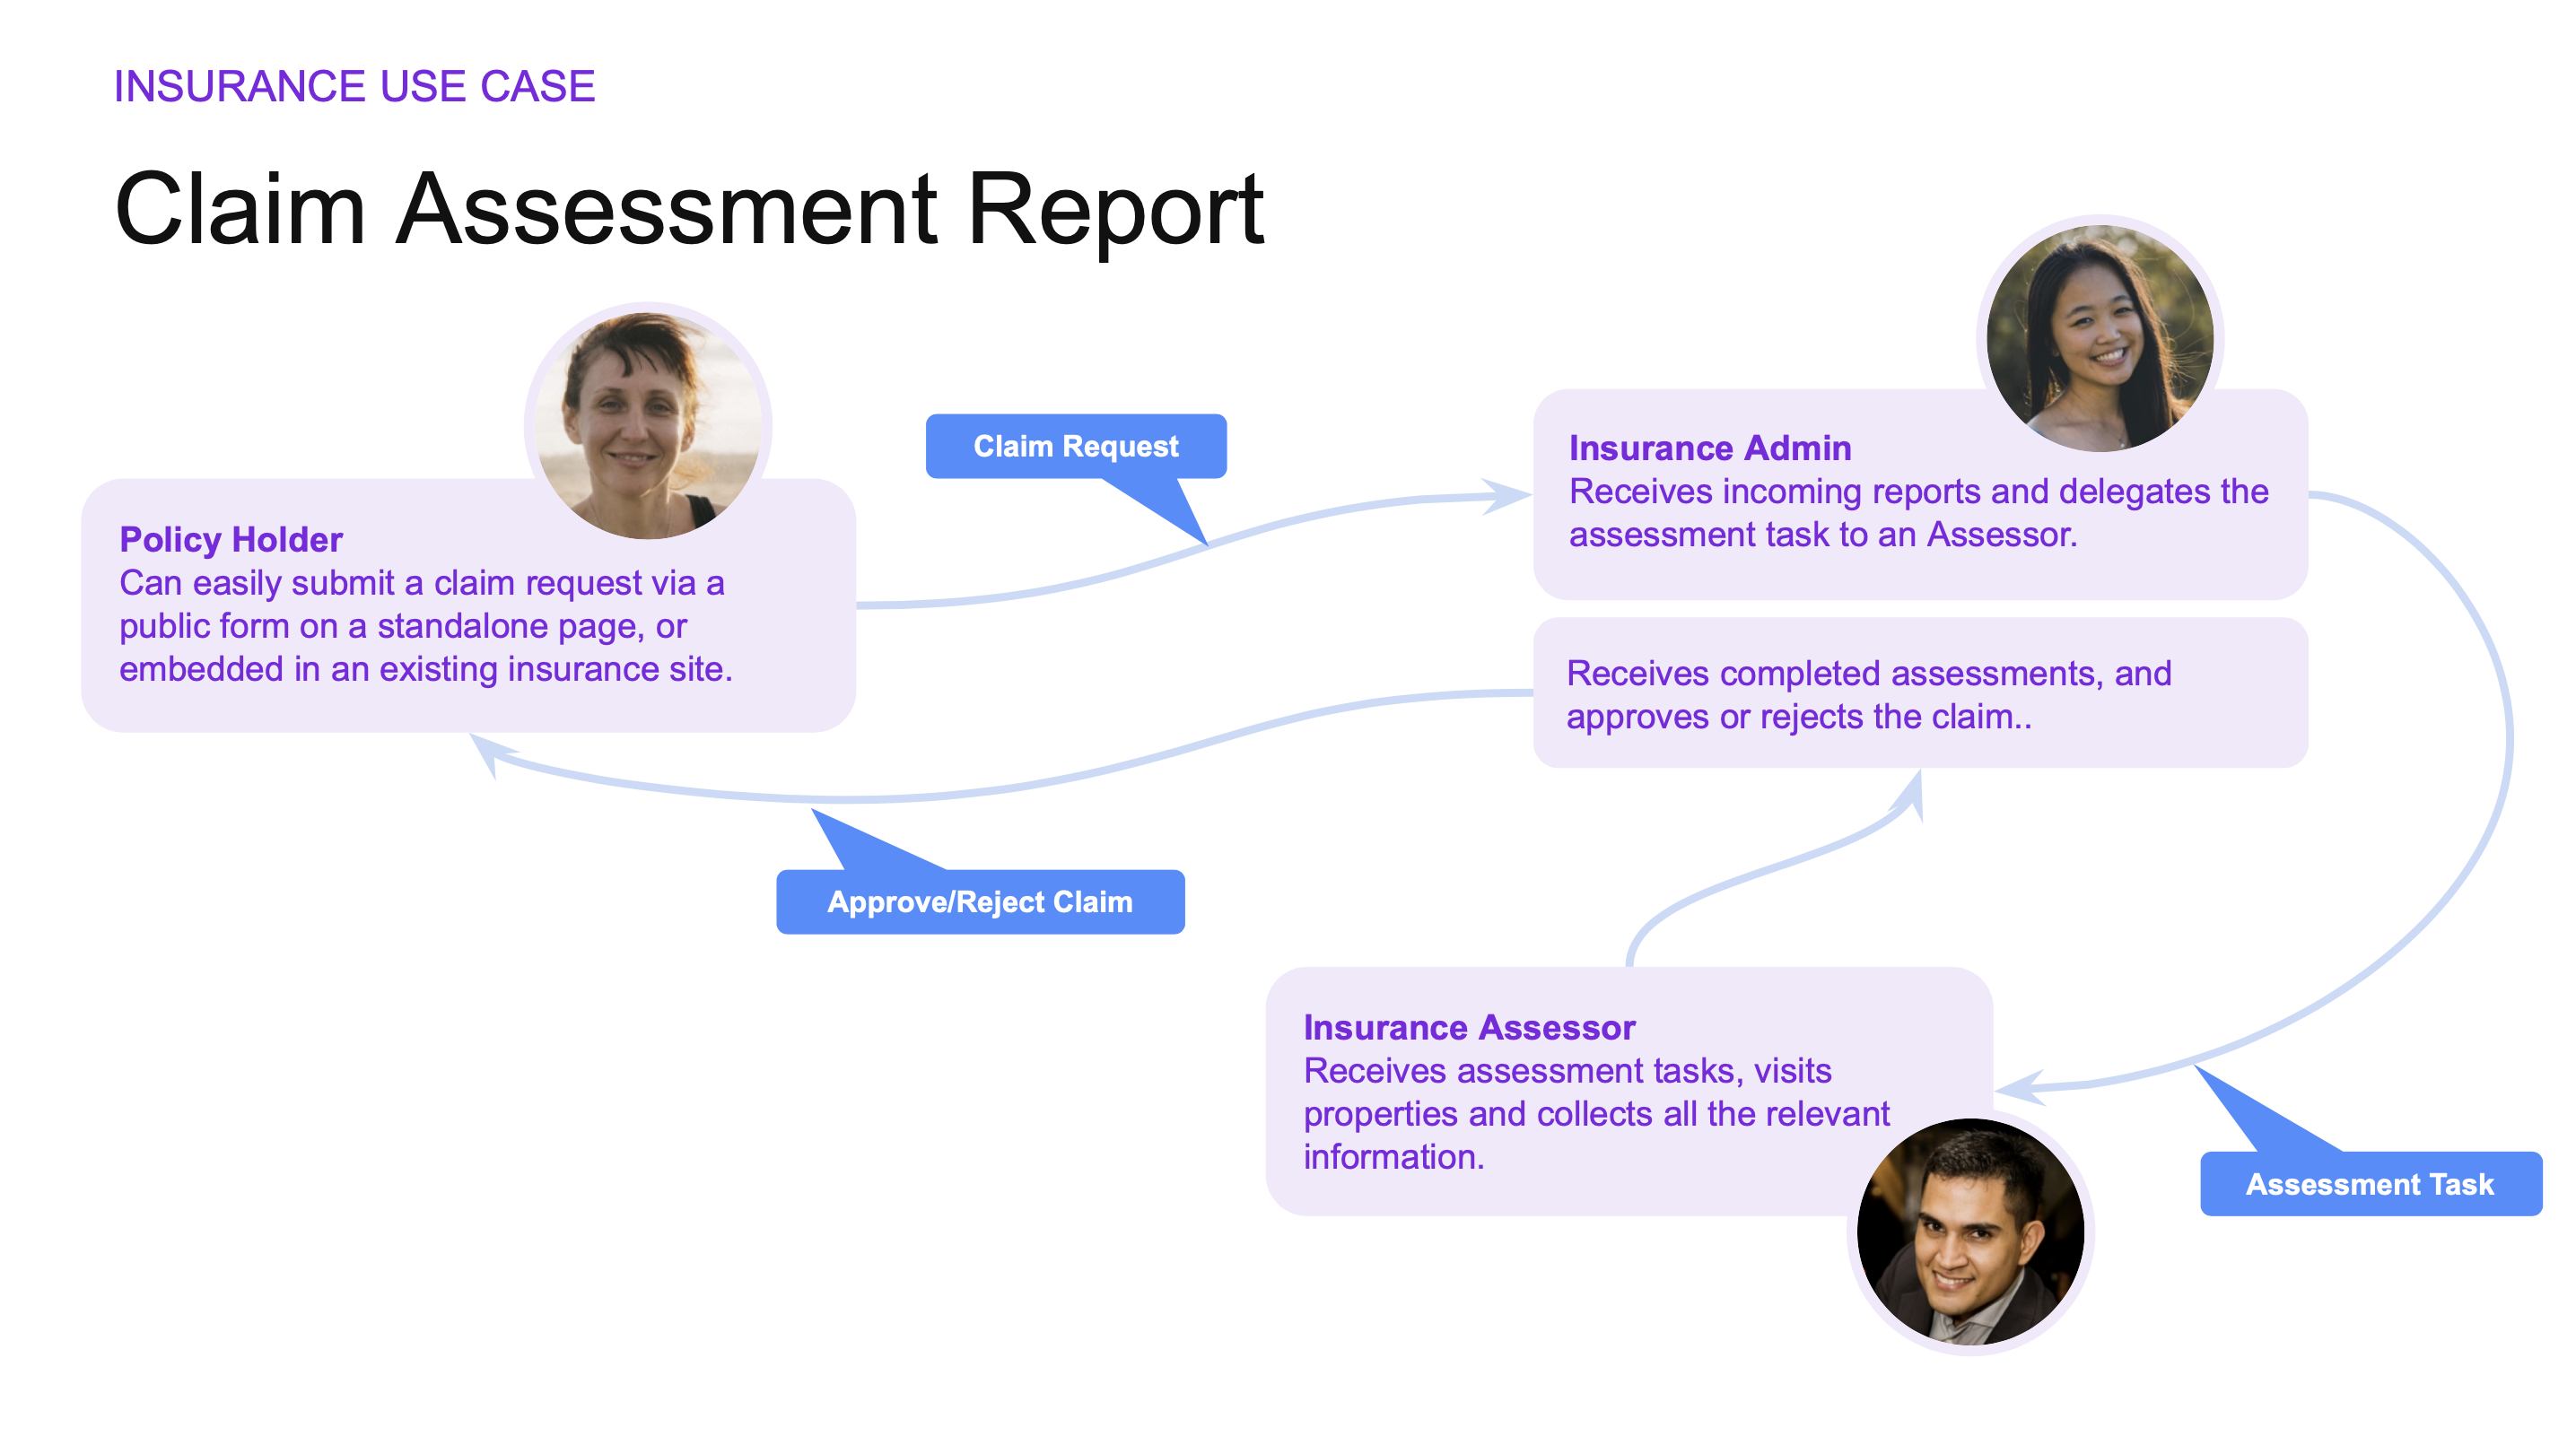 This is a simplified view as in reality data may be exported or imported from back office systems to assist in the assessment of an insurance claim. For the purposes of this exercise it is sufficient for us to build a prototype solution.
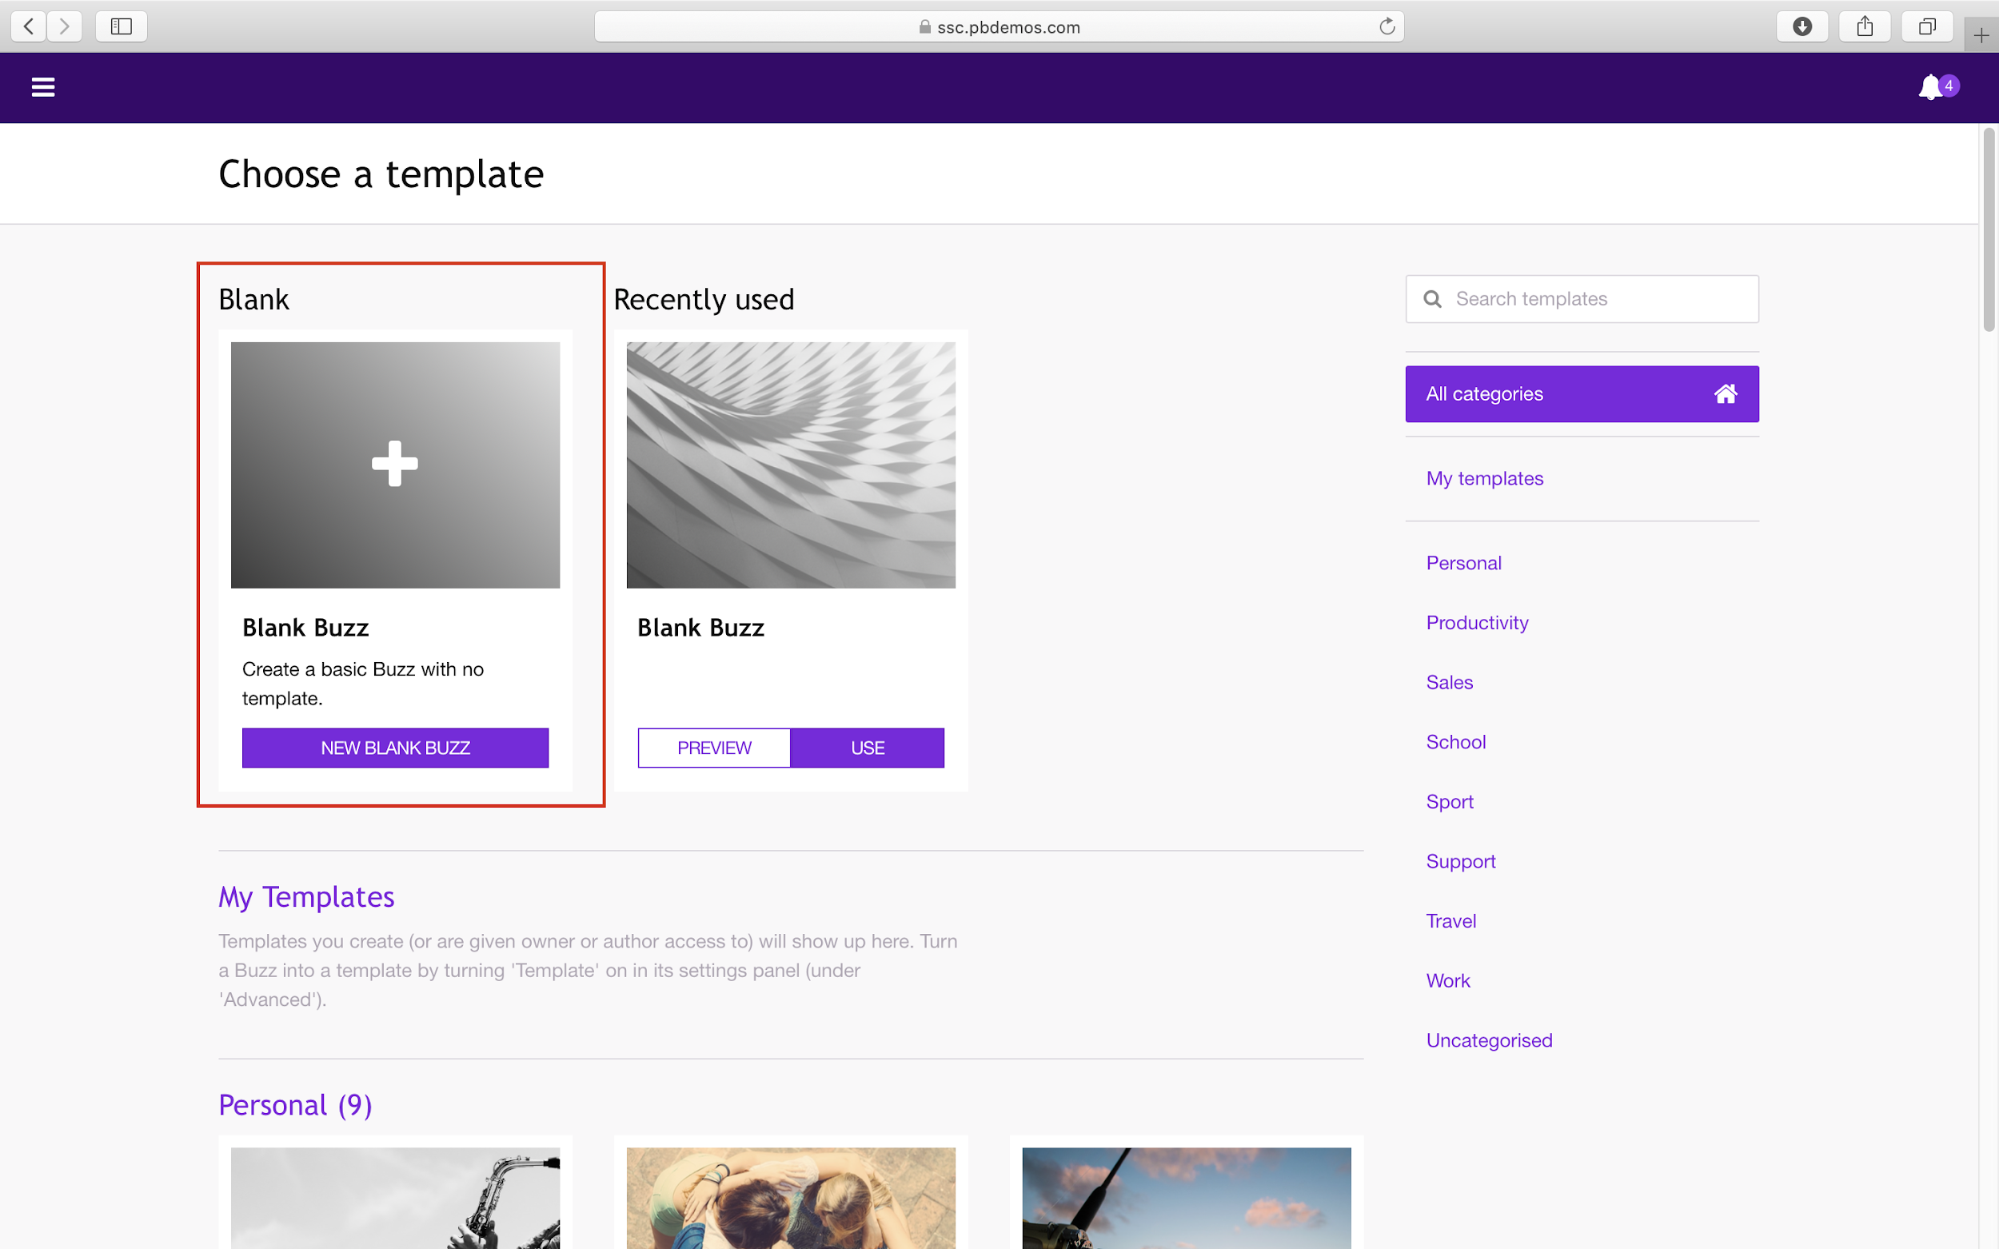
We will build our prototype app using the blank Buzz template. So click Create a new buzz. Then click Blank Buzz.
 You will now be in the app builder. Before we start building the app let’s name it so you know which one is yours. Click the three ellipses to the right of Following?, then select Settings.
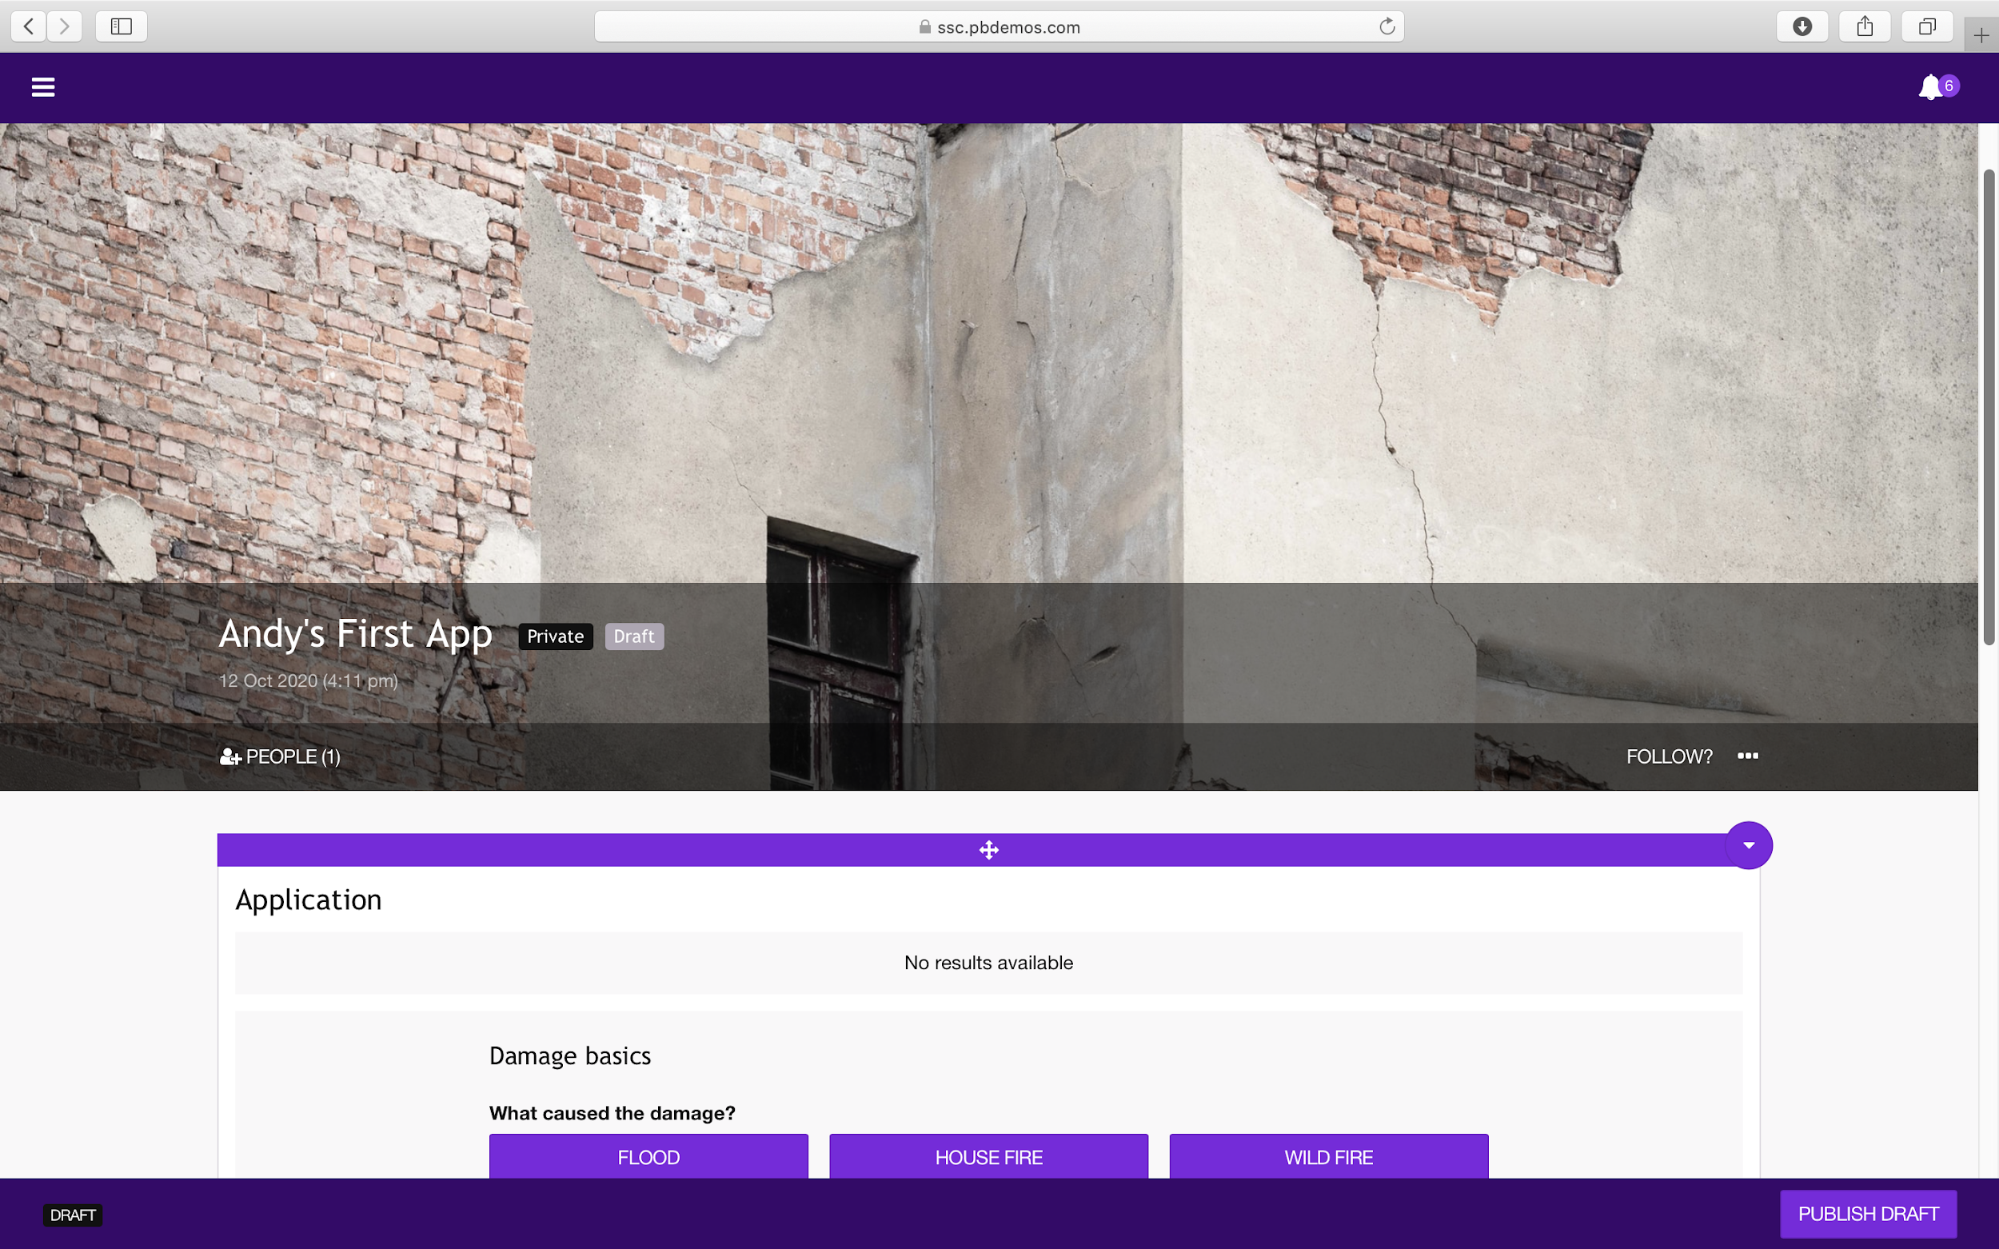
Set the title to your name and first app. Then click close. Now select Add Content.
You will now see the various components that can be added. For this exercise select Application. The blank application is added to the Buzz and we can now build our app. The scenario we are going to construct our app for is to allow members of the public to report damage to their property.
In the application pane click the down arrow in the top right and select Properties.
 In the properties area most of the work to construct the application will be conducted within the fields section. Before we start adding fields lets select Submit and set the way in which people will interact with the application. The submit form should be set to inline.
Now select the Fields tab.
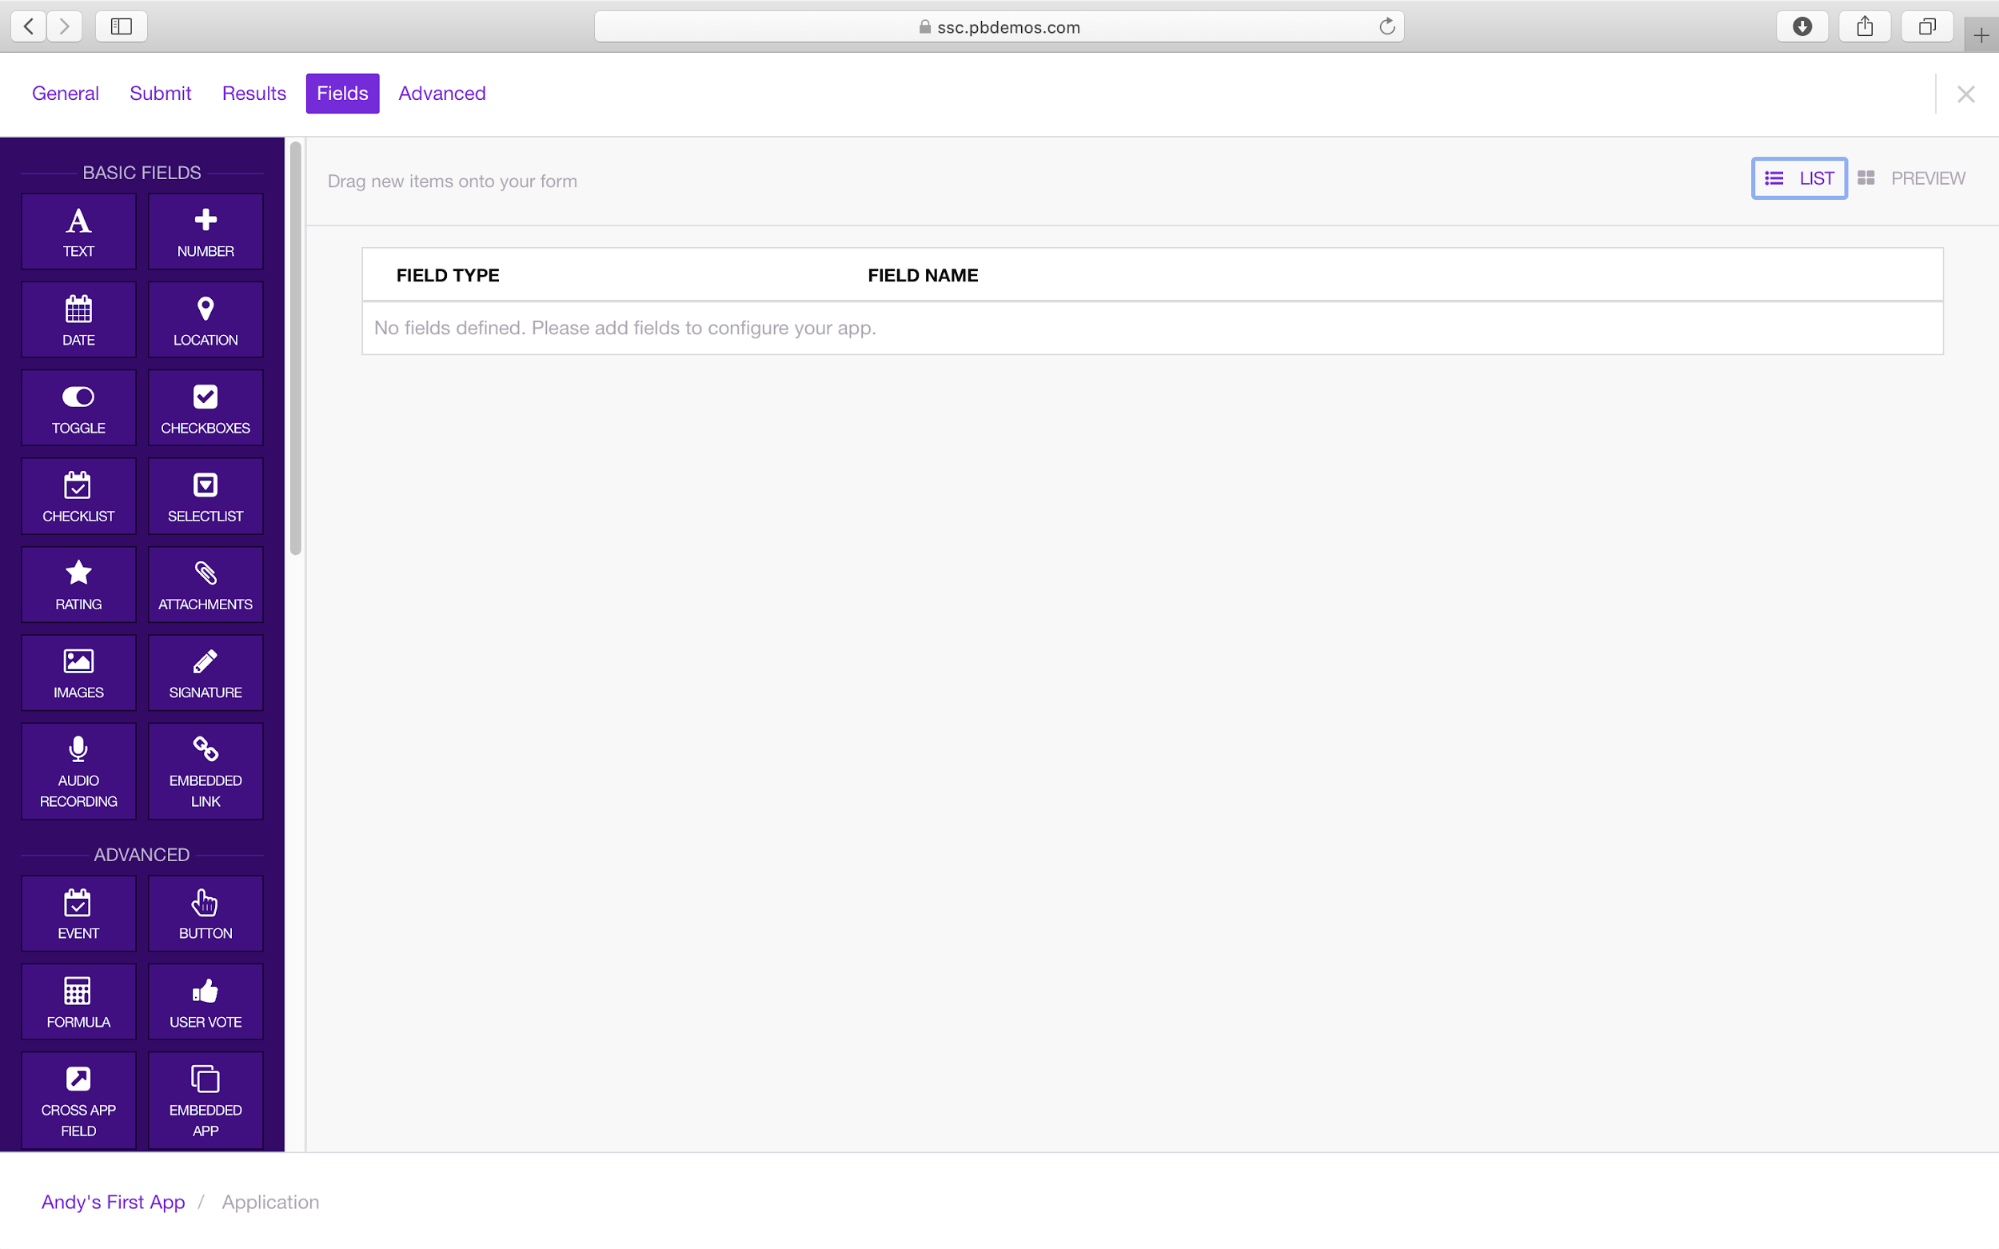 On the left hand side of the screen are the various fields that can be added to the app. We will explore these as we construct our building damage reporting app. To add any of these fields to the app simply click and drag the desired field onto the canvas in the centre of the screen.
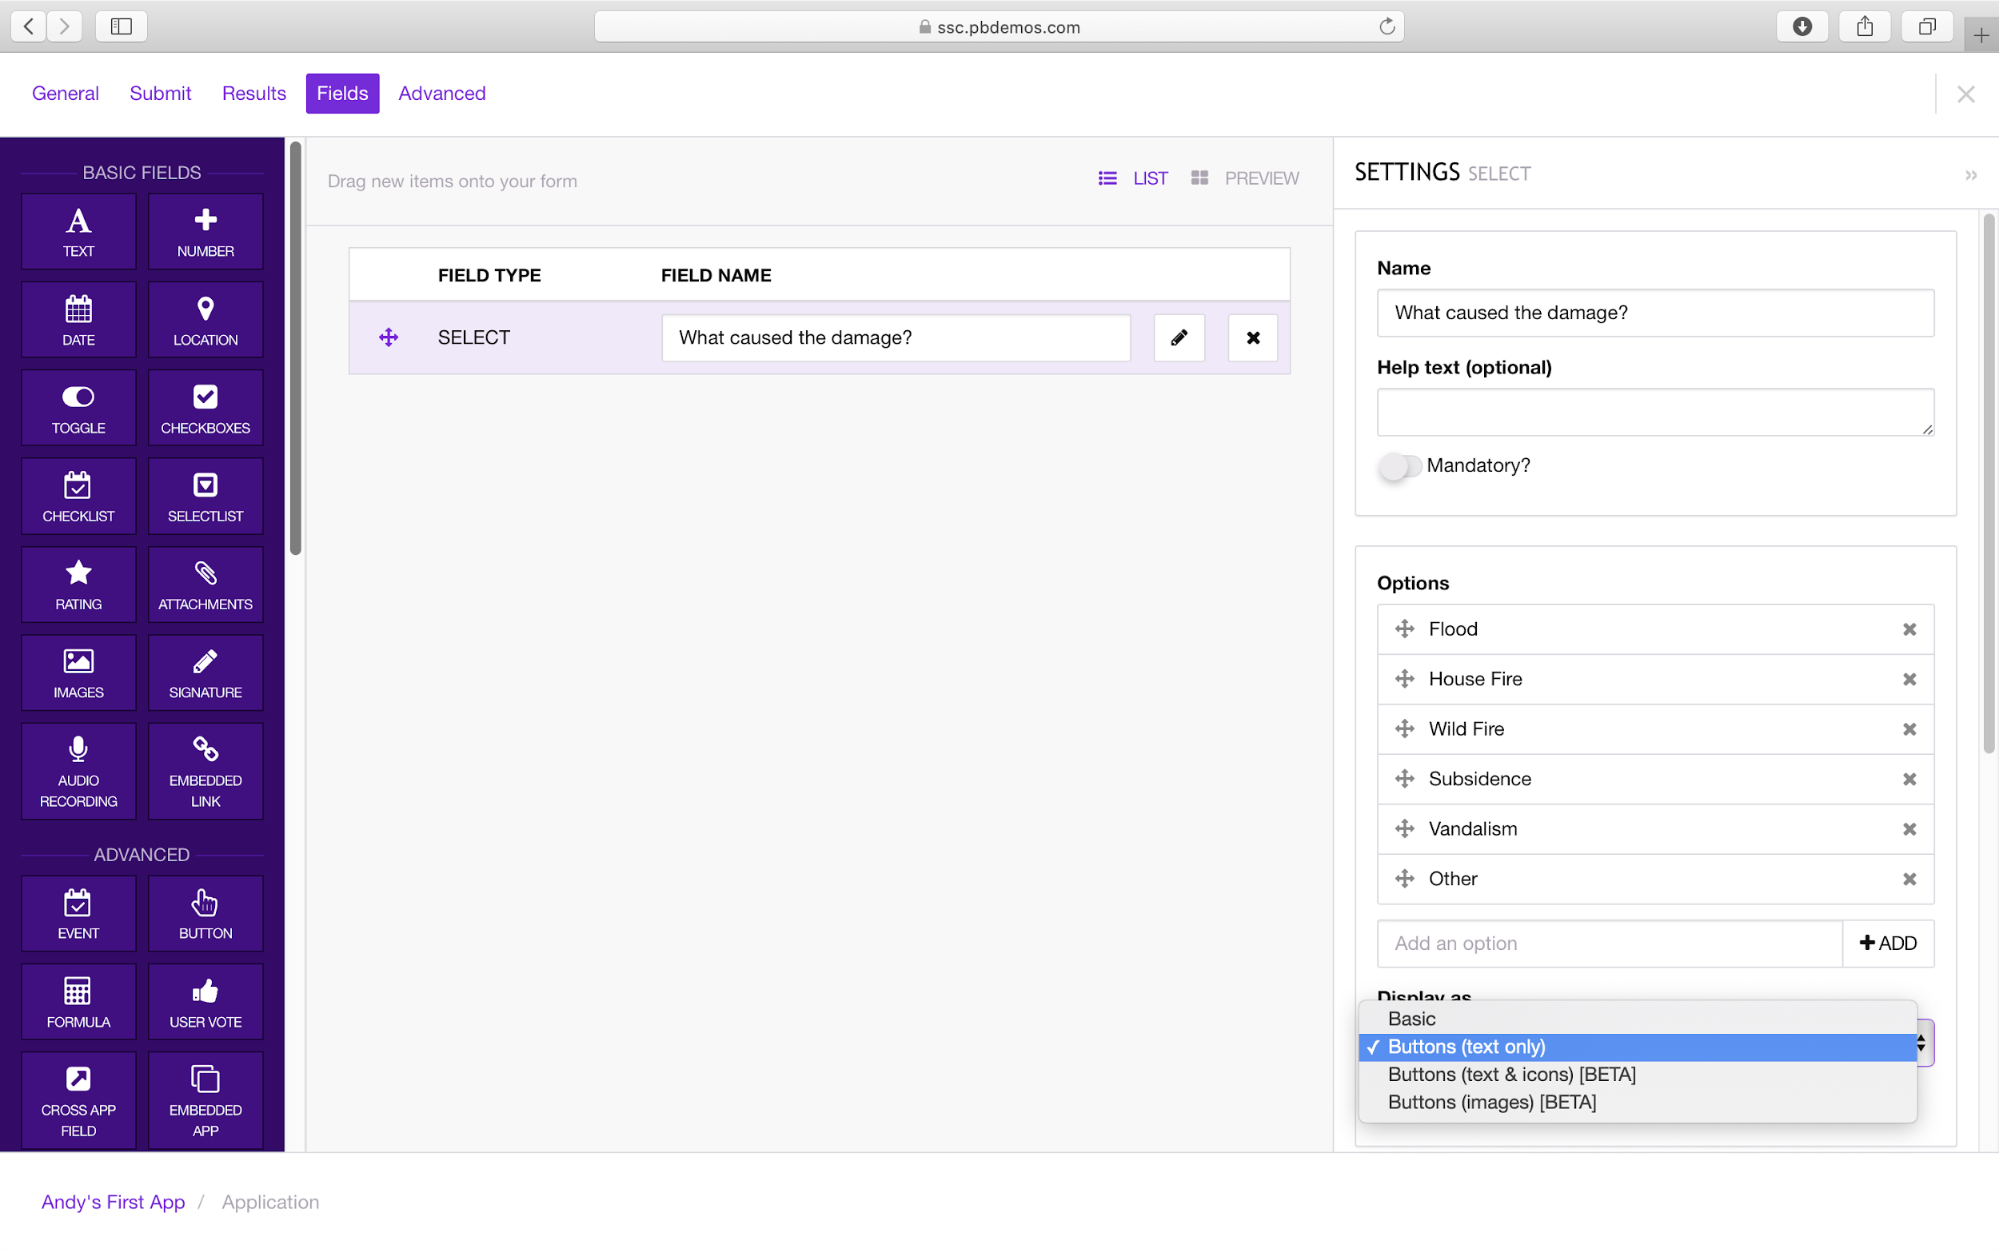
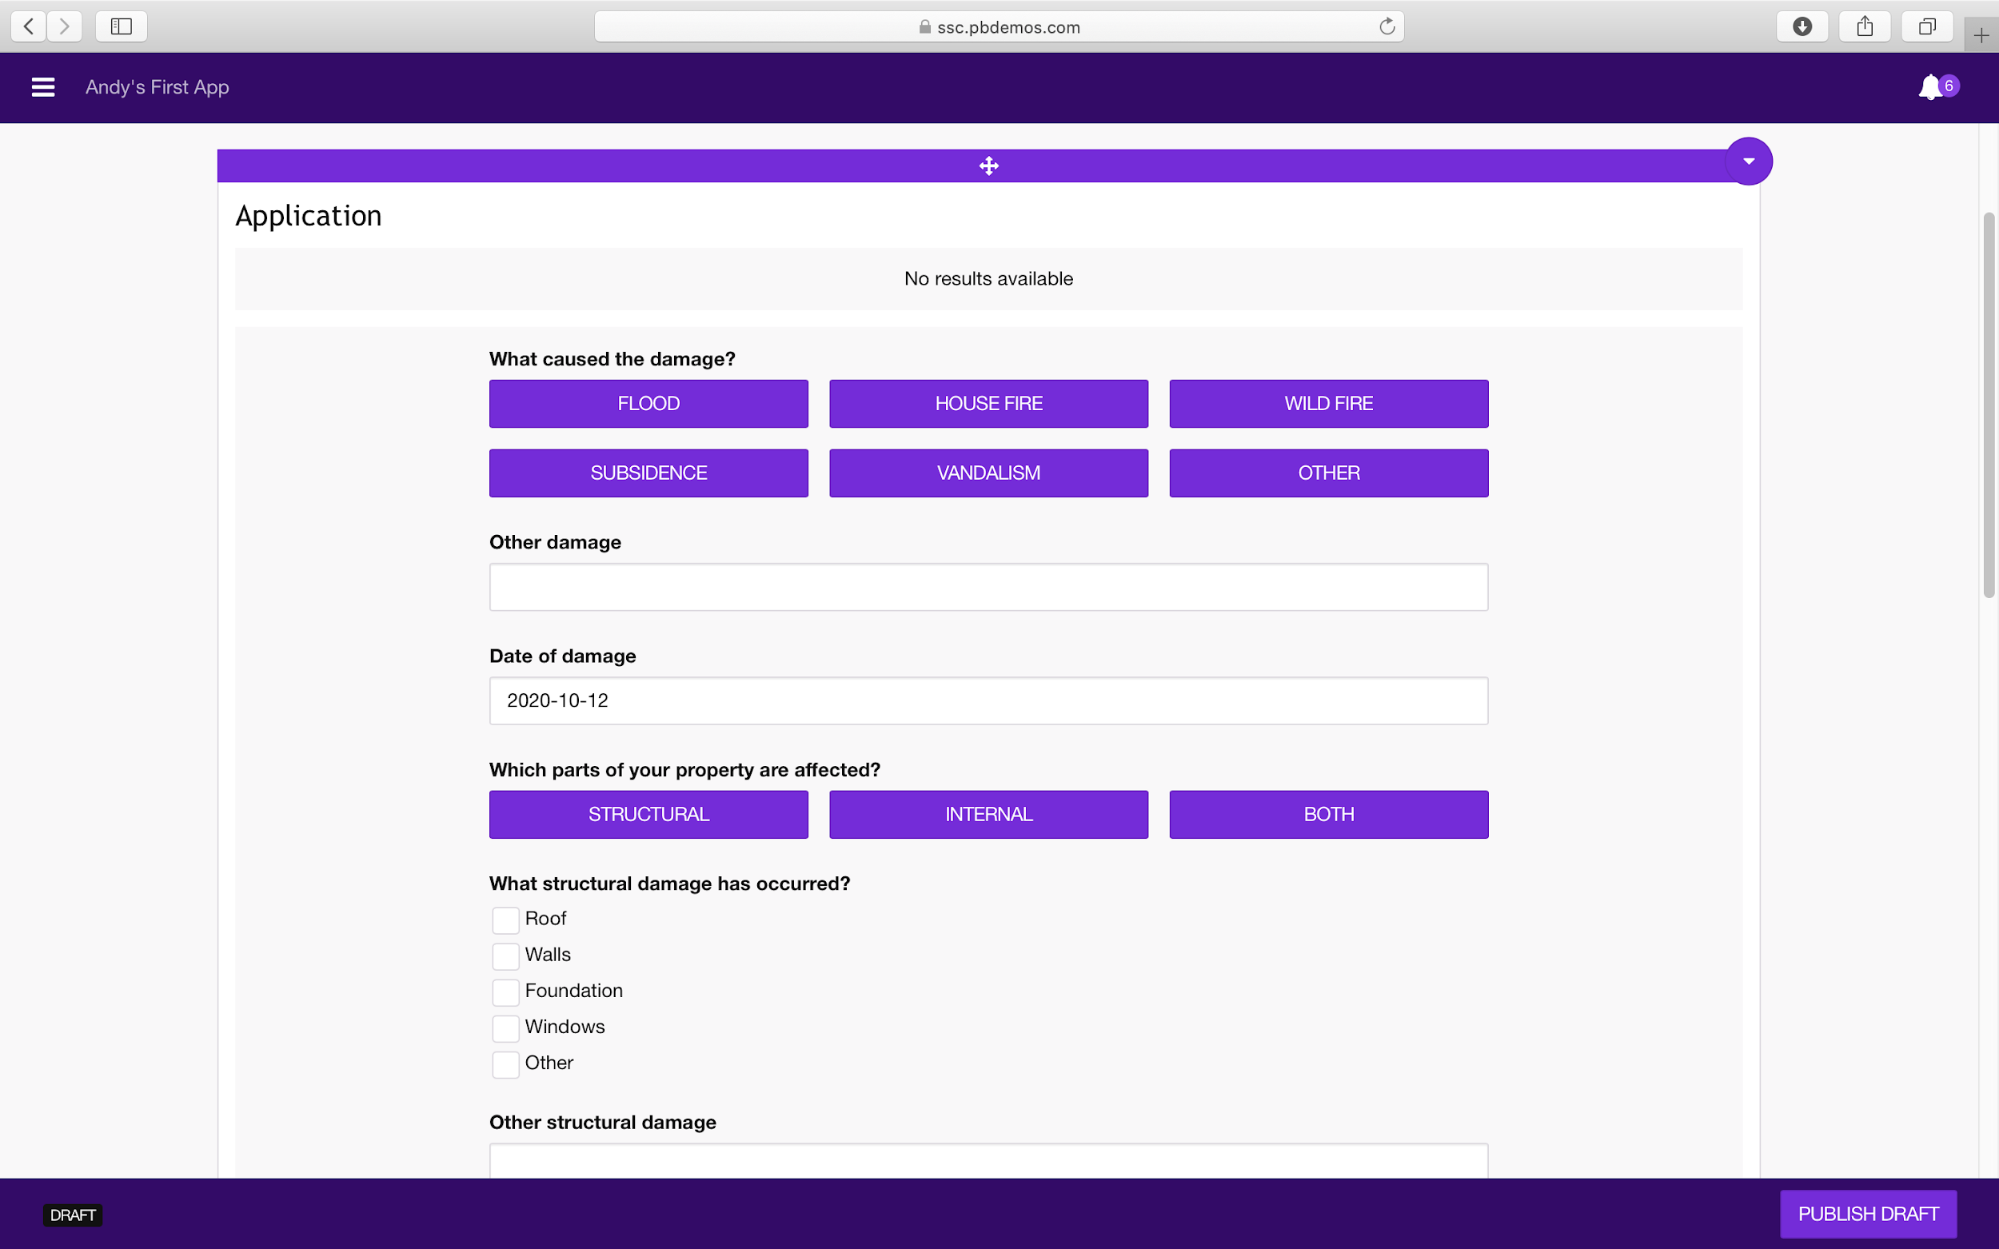
The first field we will add is one to discover what caused the damage. Drag the SelectList field onto the canvas. Name this field What caused the damage?. Then select the edit tool  . In the options section type Flood then click +Add. Add additional options House Fire, Wild Fire, Subsidence, Vandalism and Other.
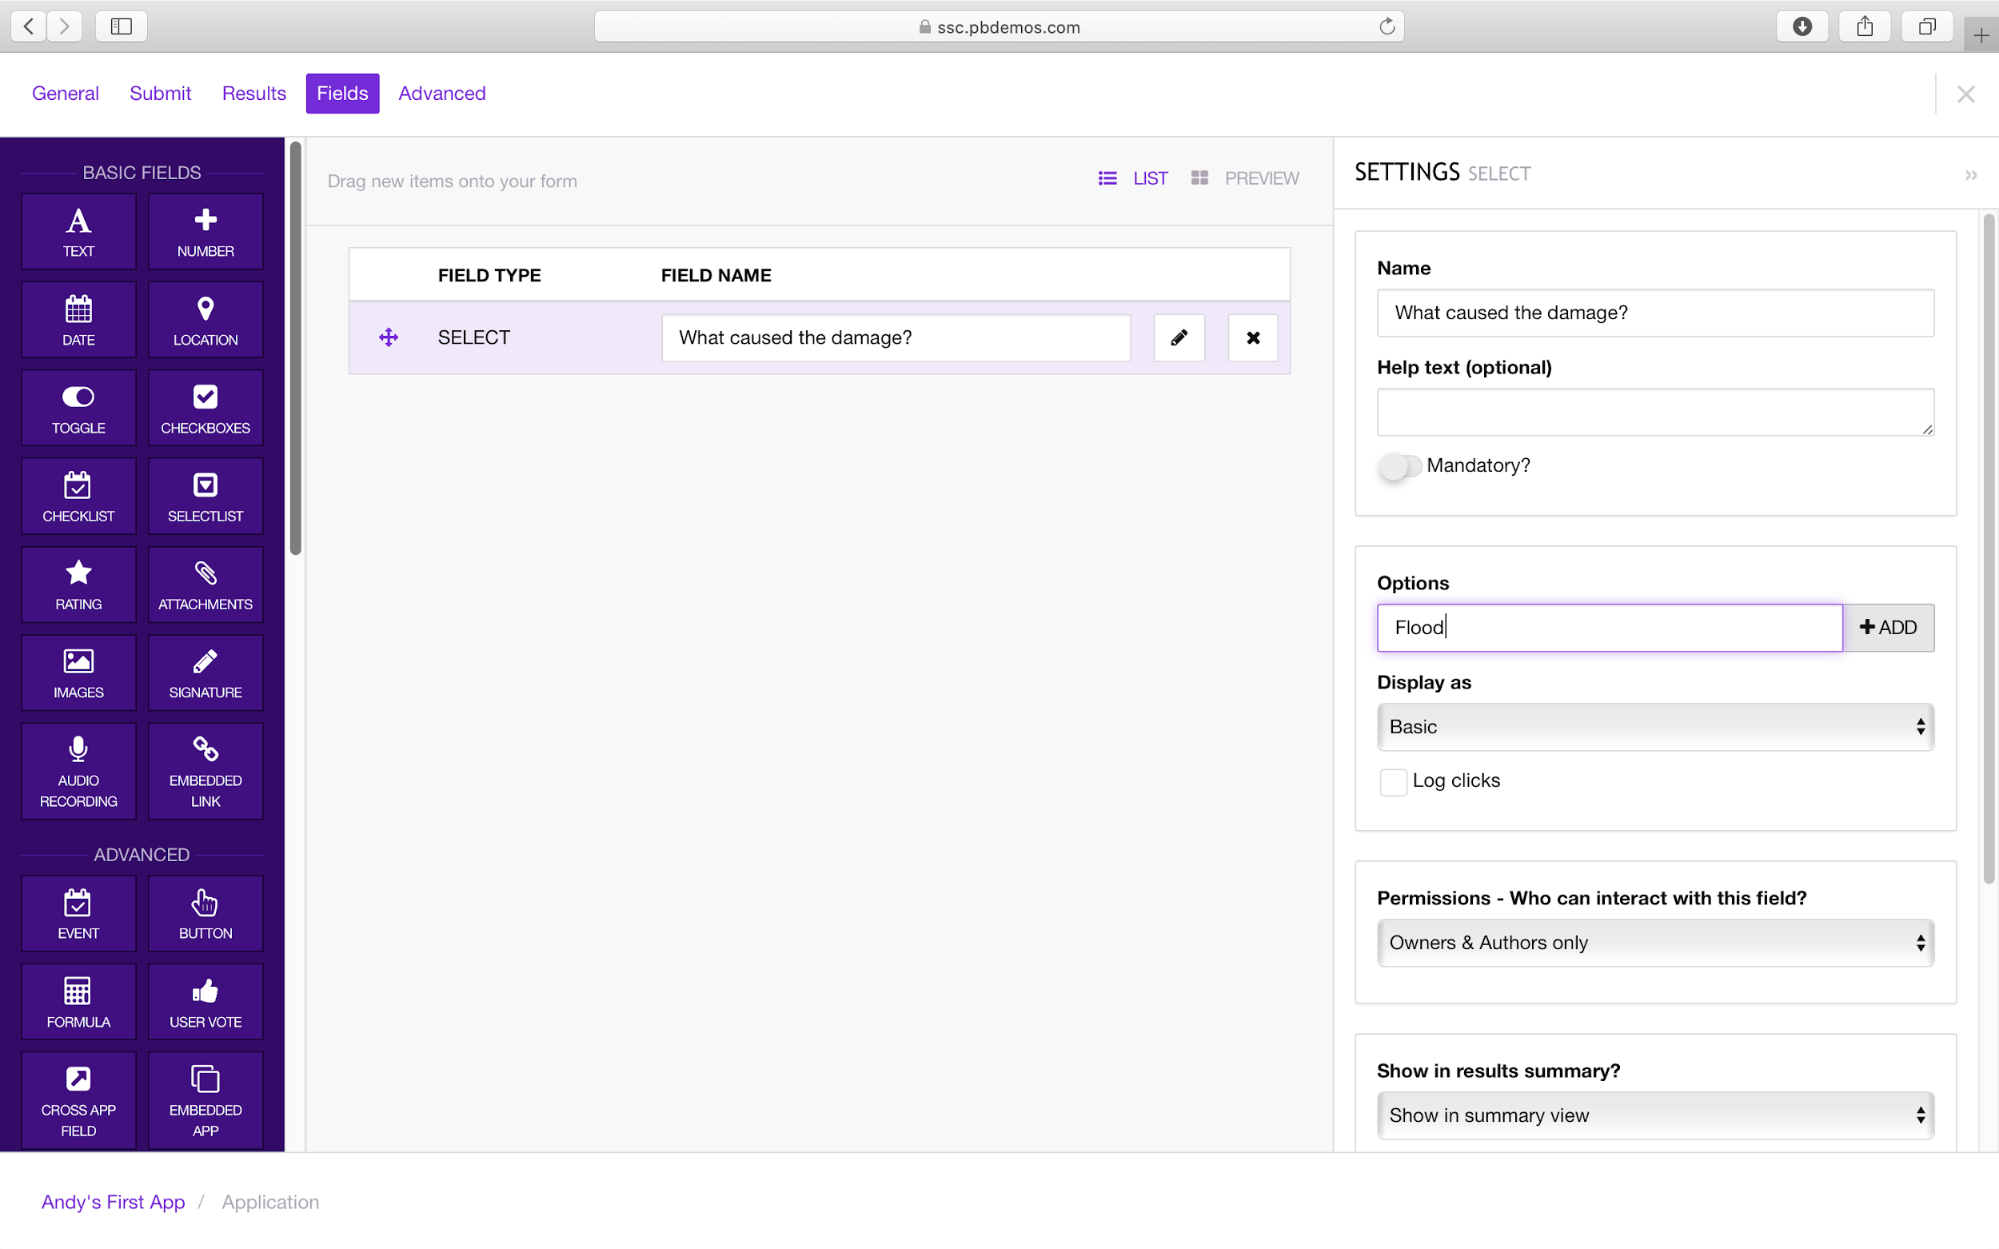 Once all the options have been added click the Display as option and choose Button (text only).
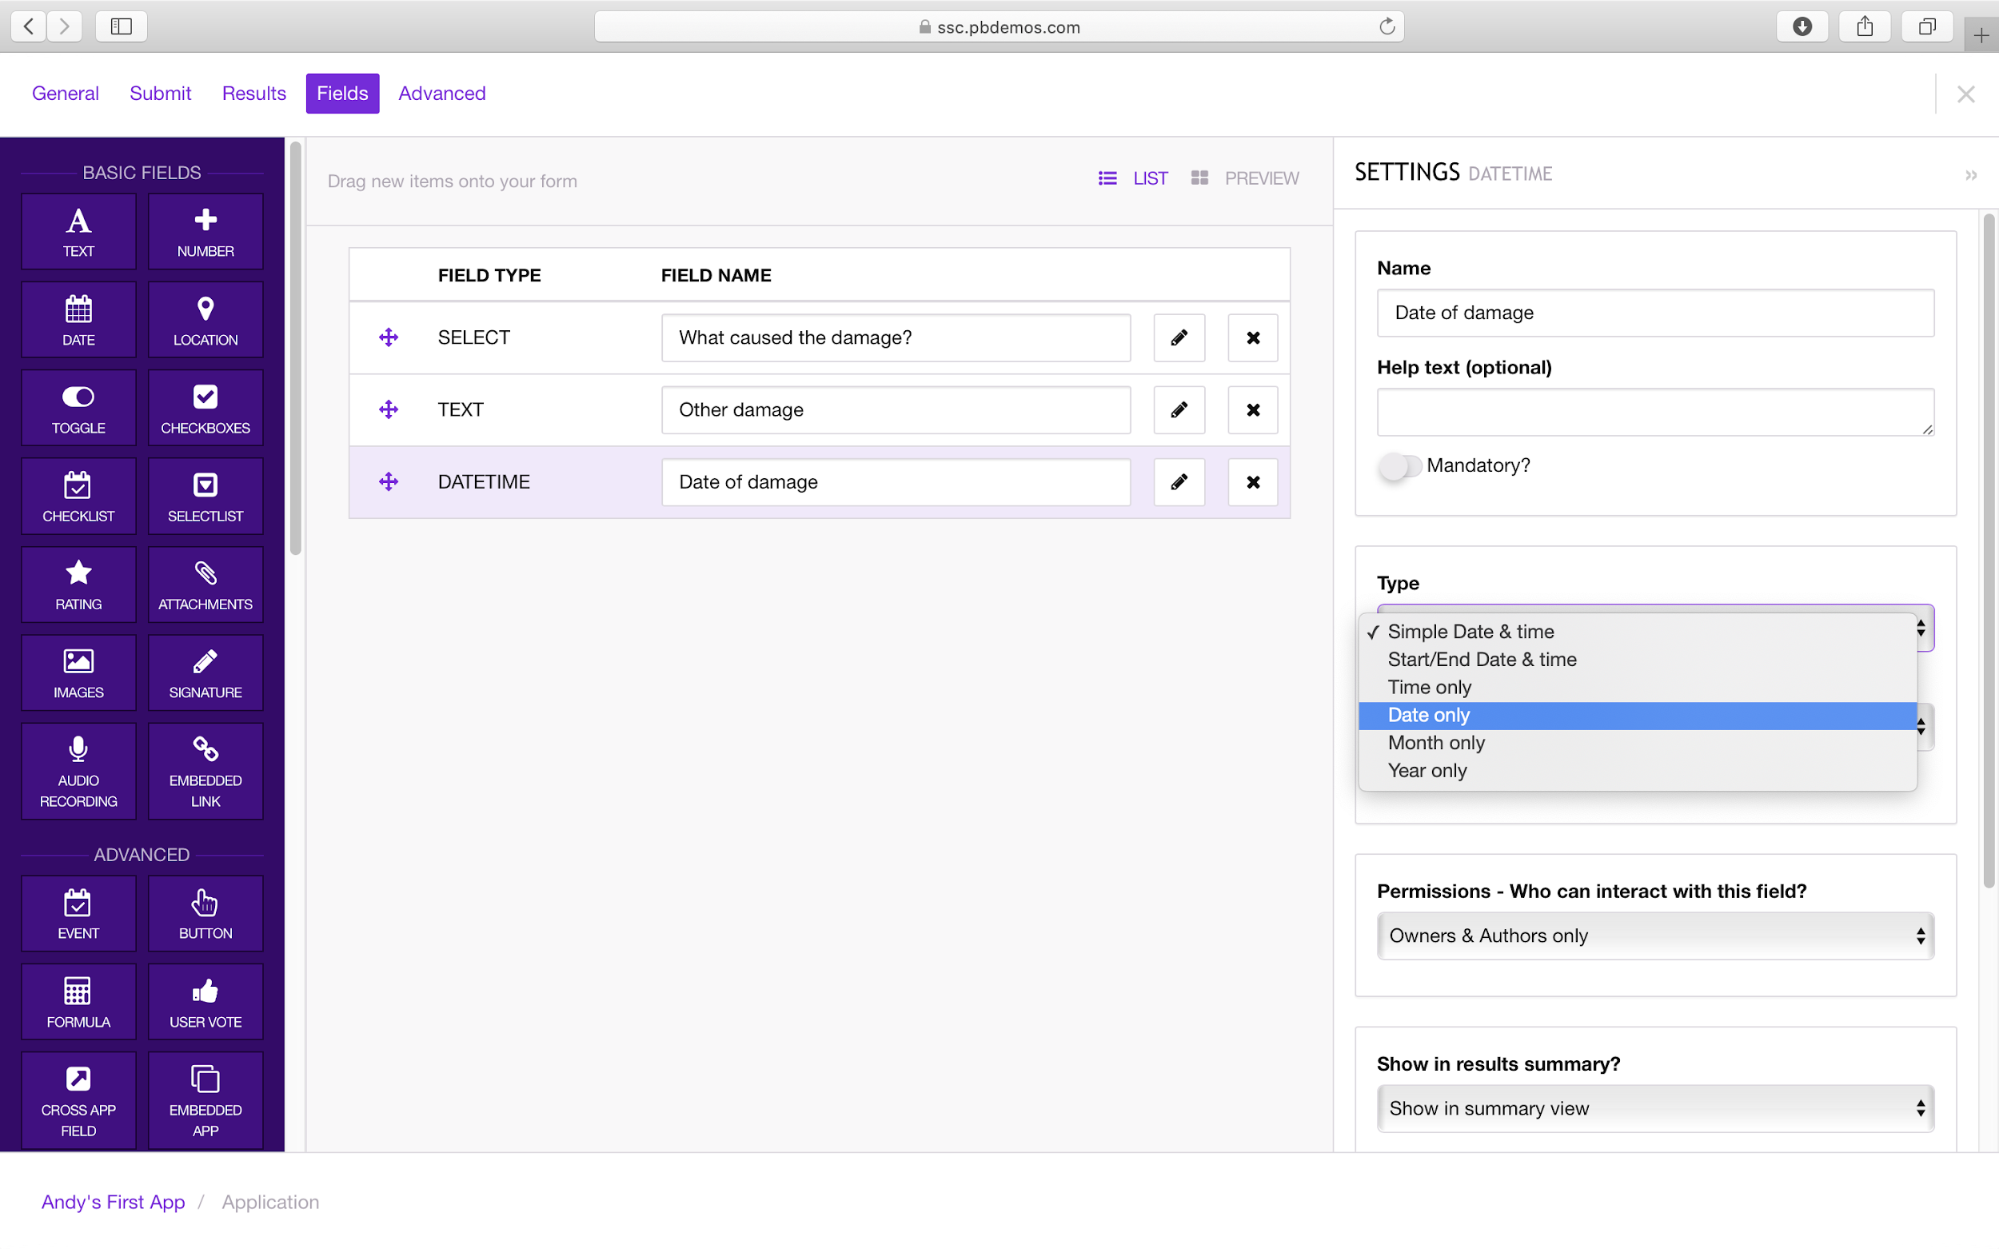
 Drag a Text field onto the canvas and name this Other damage. Add a Date field name it Date of damage and select the type as Date only.
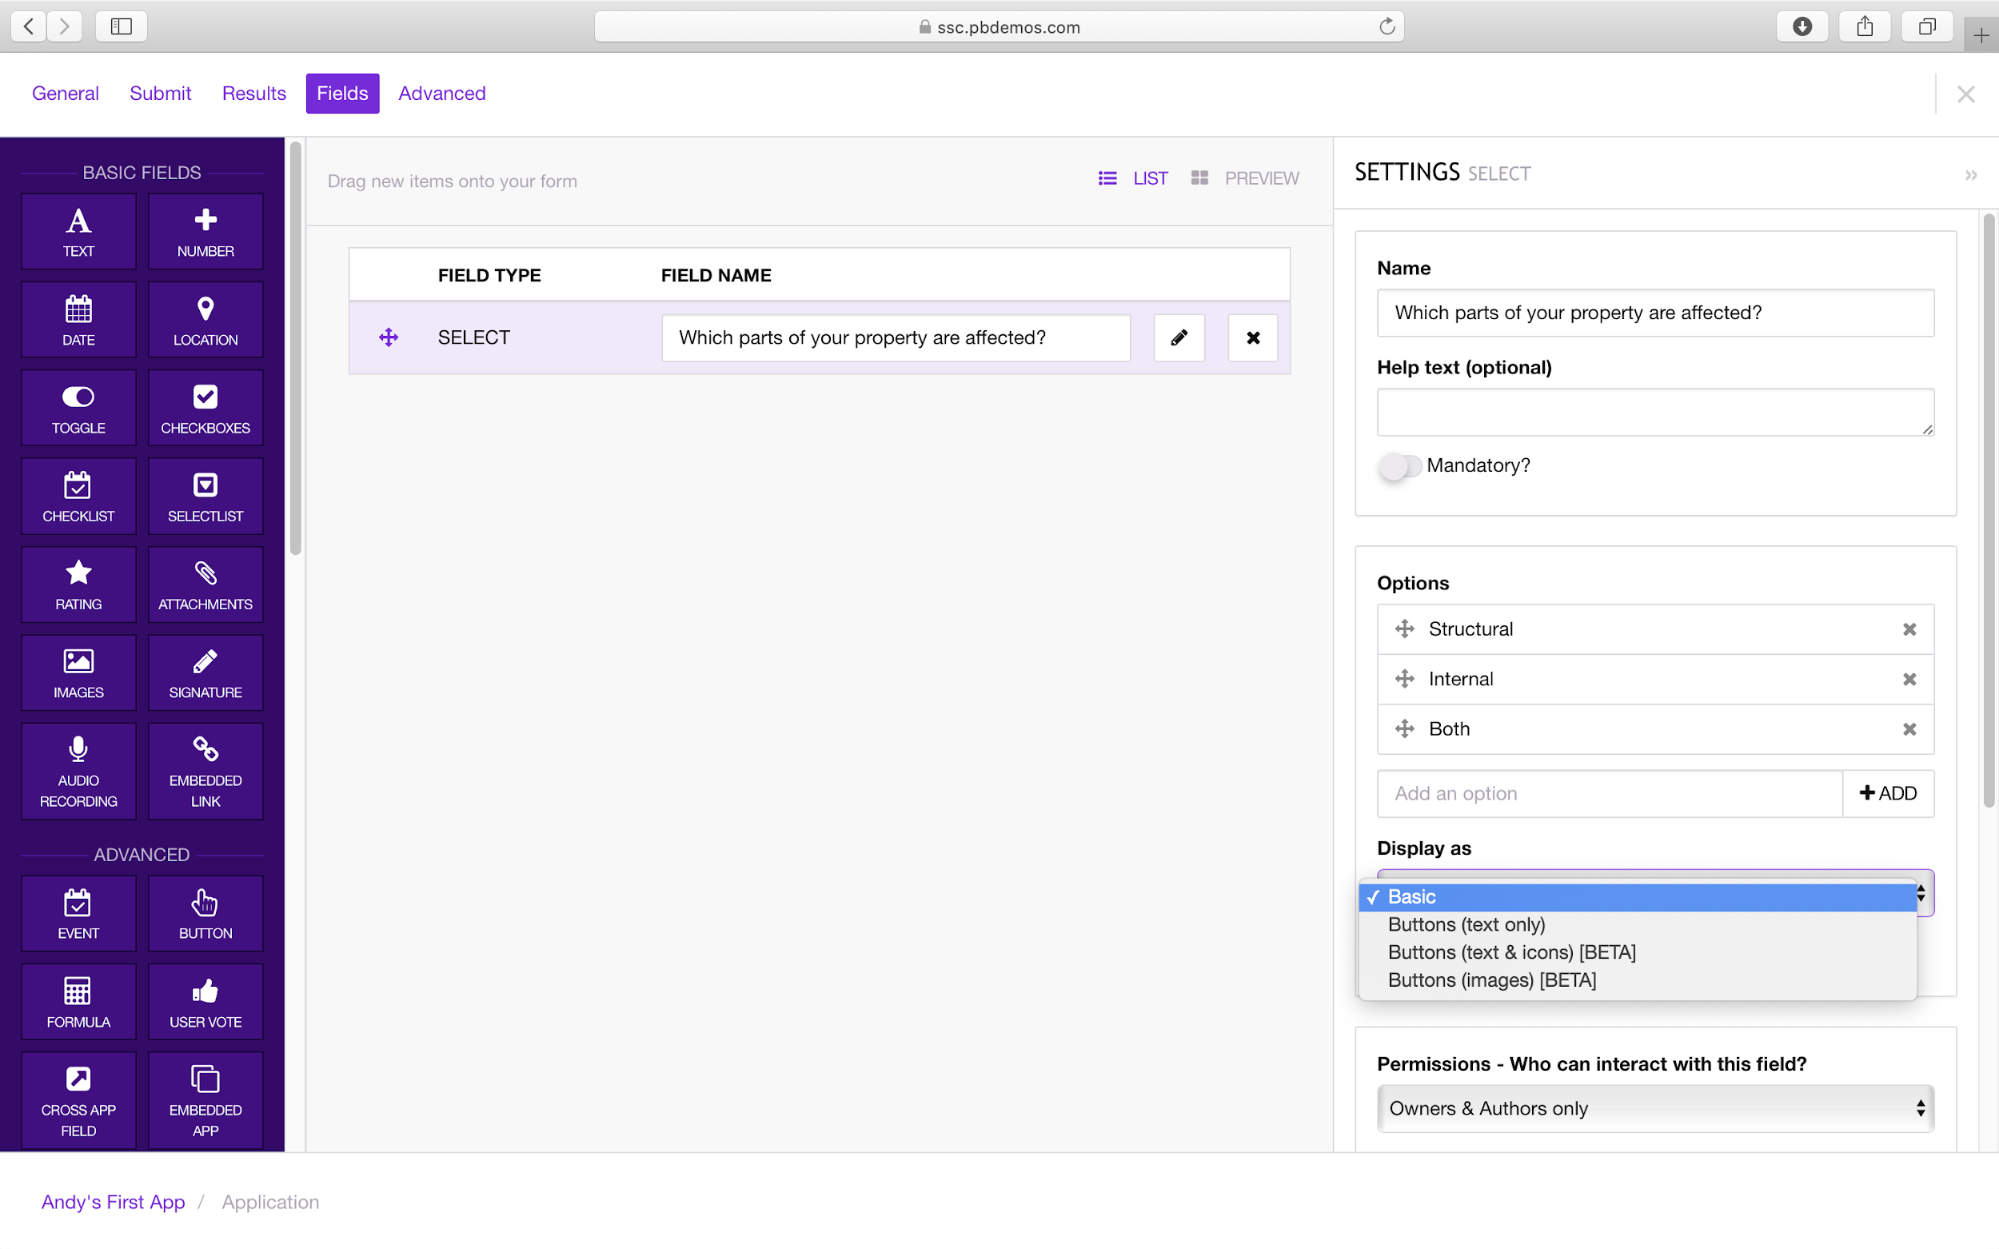
 Add another SelectList field and name this Which parts of your property are affected?
Under Options type Structure, Internal and Both as options, again for the Display as select Button (text only).
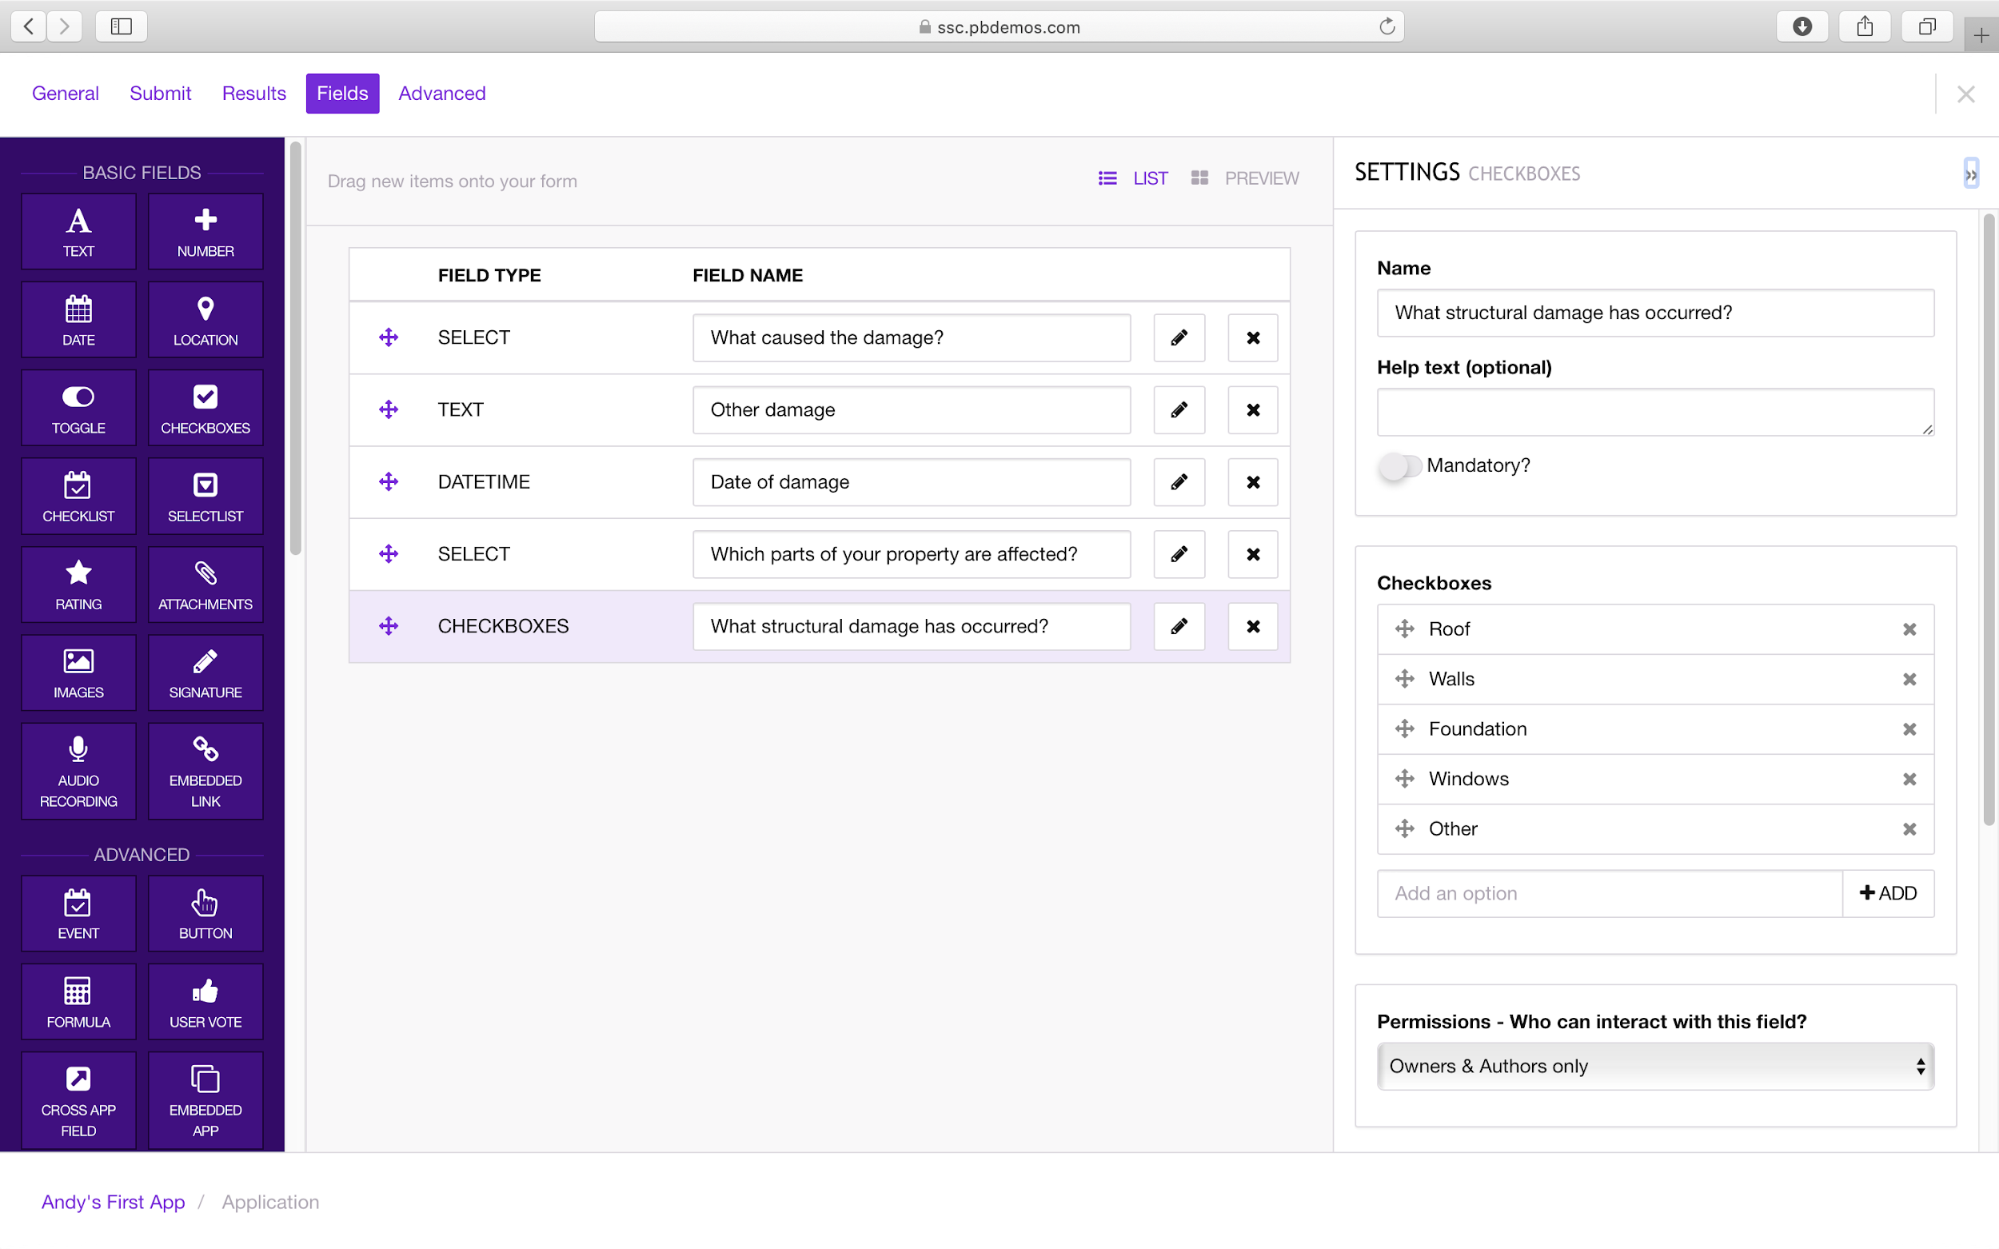
 Next drag a CheckBoxes onto the canvas, name this What structural damage has occurred?. Options should include Roof, Walls, Foundation, Windows and Other.
Drag a Text object onto the canvas and name this Other structural damage.
Then add an Images field and name this Add photos of structural damage.
This completes teh questions we want to ask about the structural damage. we can now ask similar questions for internal damage. Add another CheckBoxes field Which rooms are damaged?__ and provide a list of different rooms plus include _Other as an option. Add a Text field Other room and a Number field Number of bedrooms To complete this section add another Images field Add photos of internal damage.
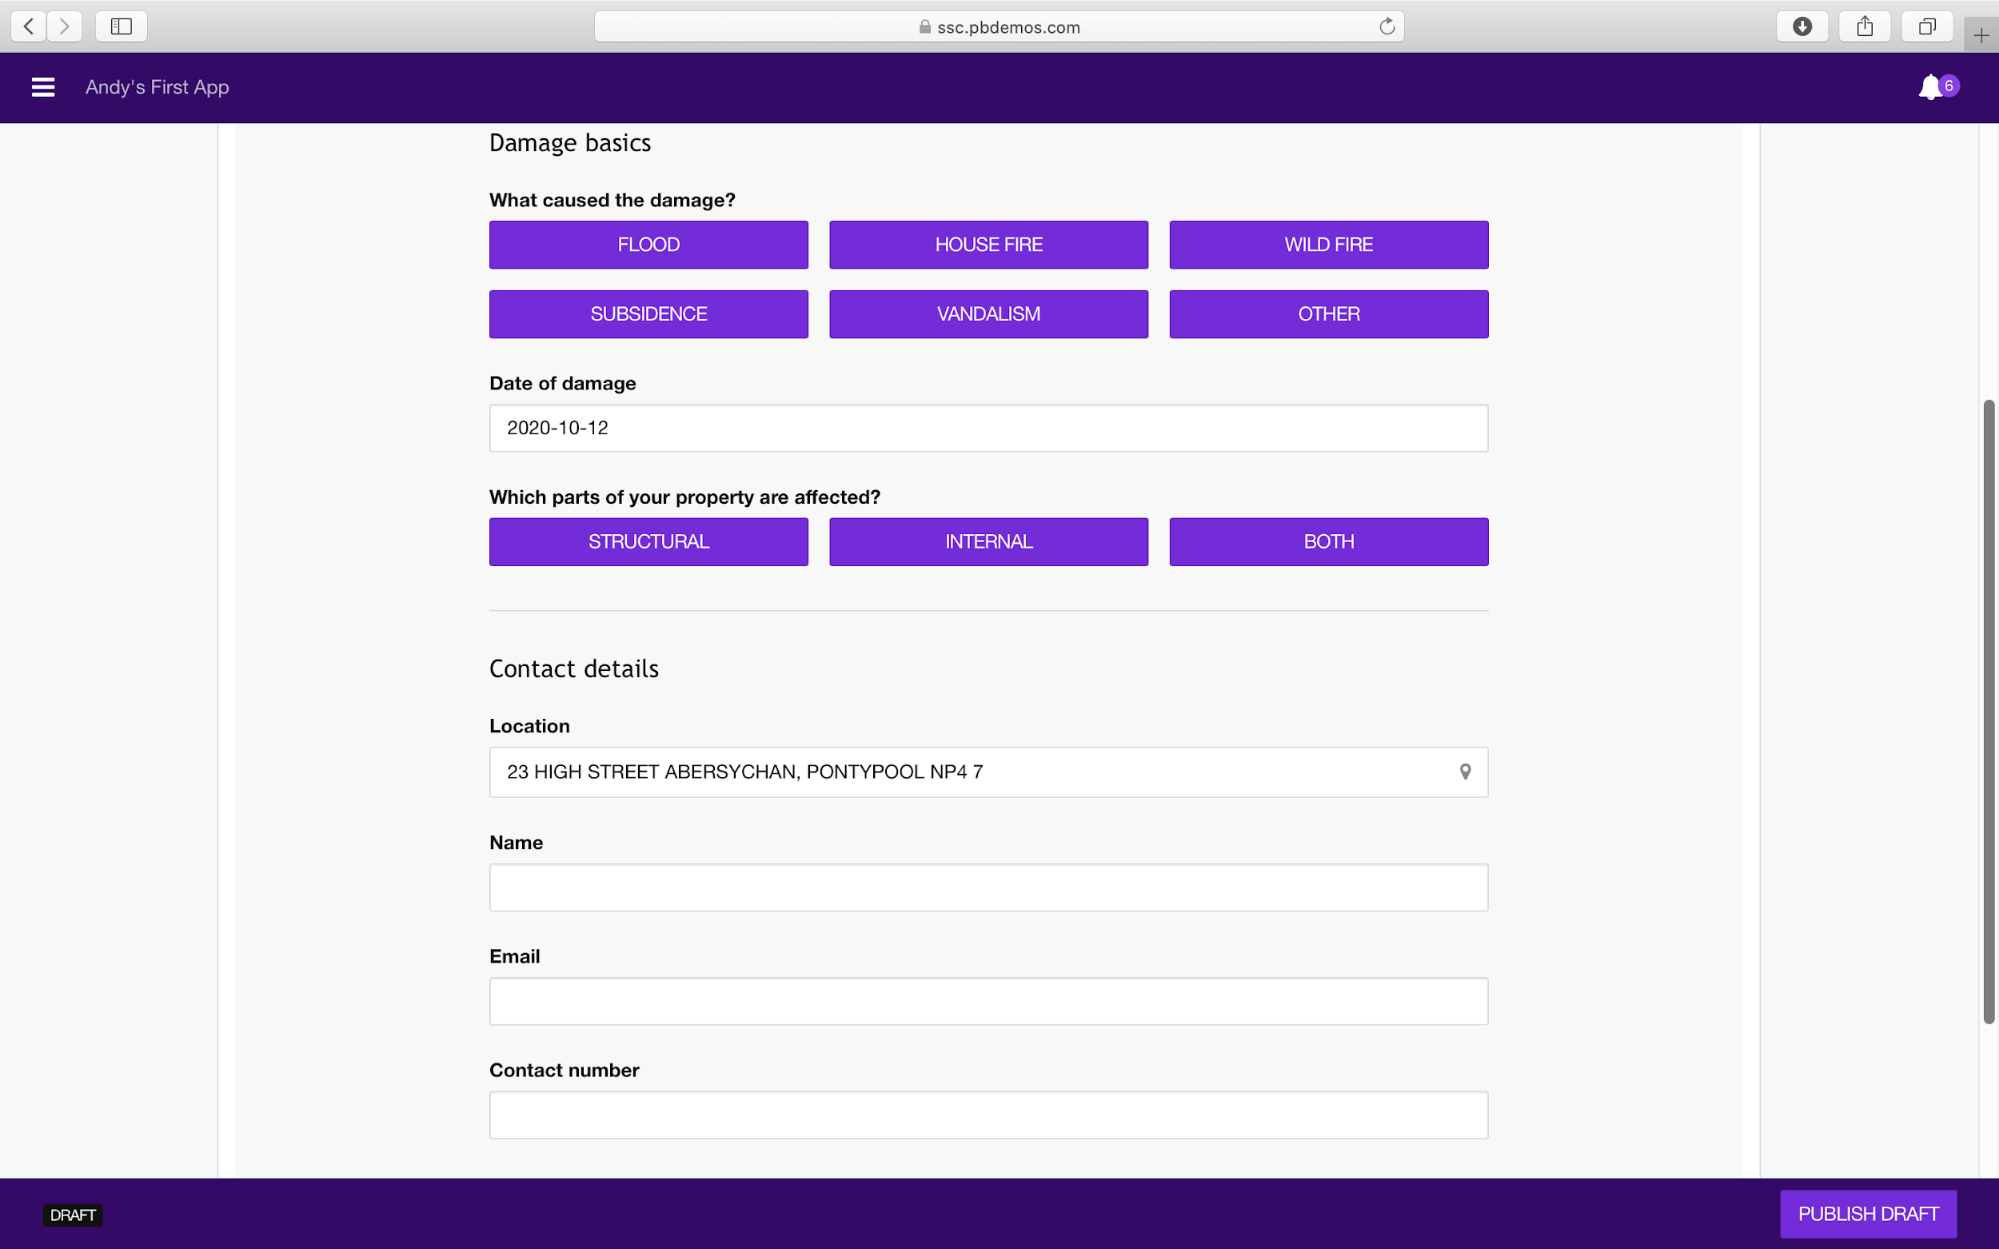
To complete the app we will add fields about the person reporting the damage. Select a Location field, this will allow users to select the location of their property off a map. If the user has allowed the app or web page to use their current location the map will centre at this point, otherwise they can navigate to their address using the search bar at the top of the map or by panning the map to the appropriate location.
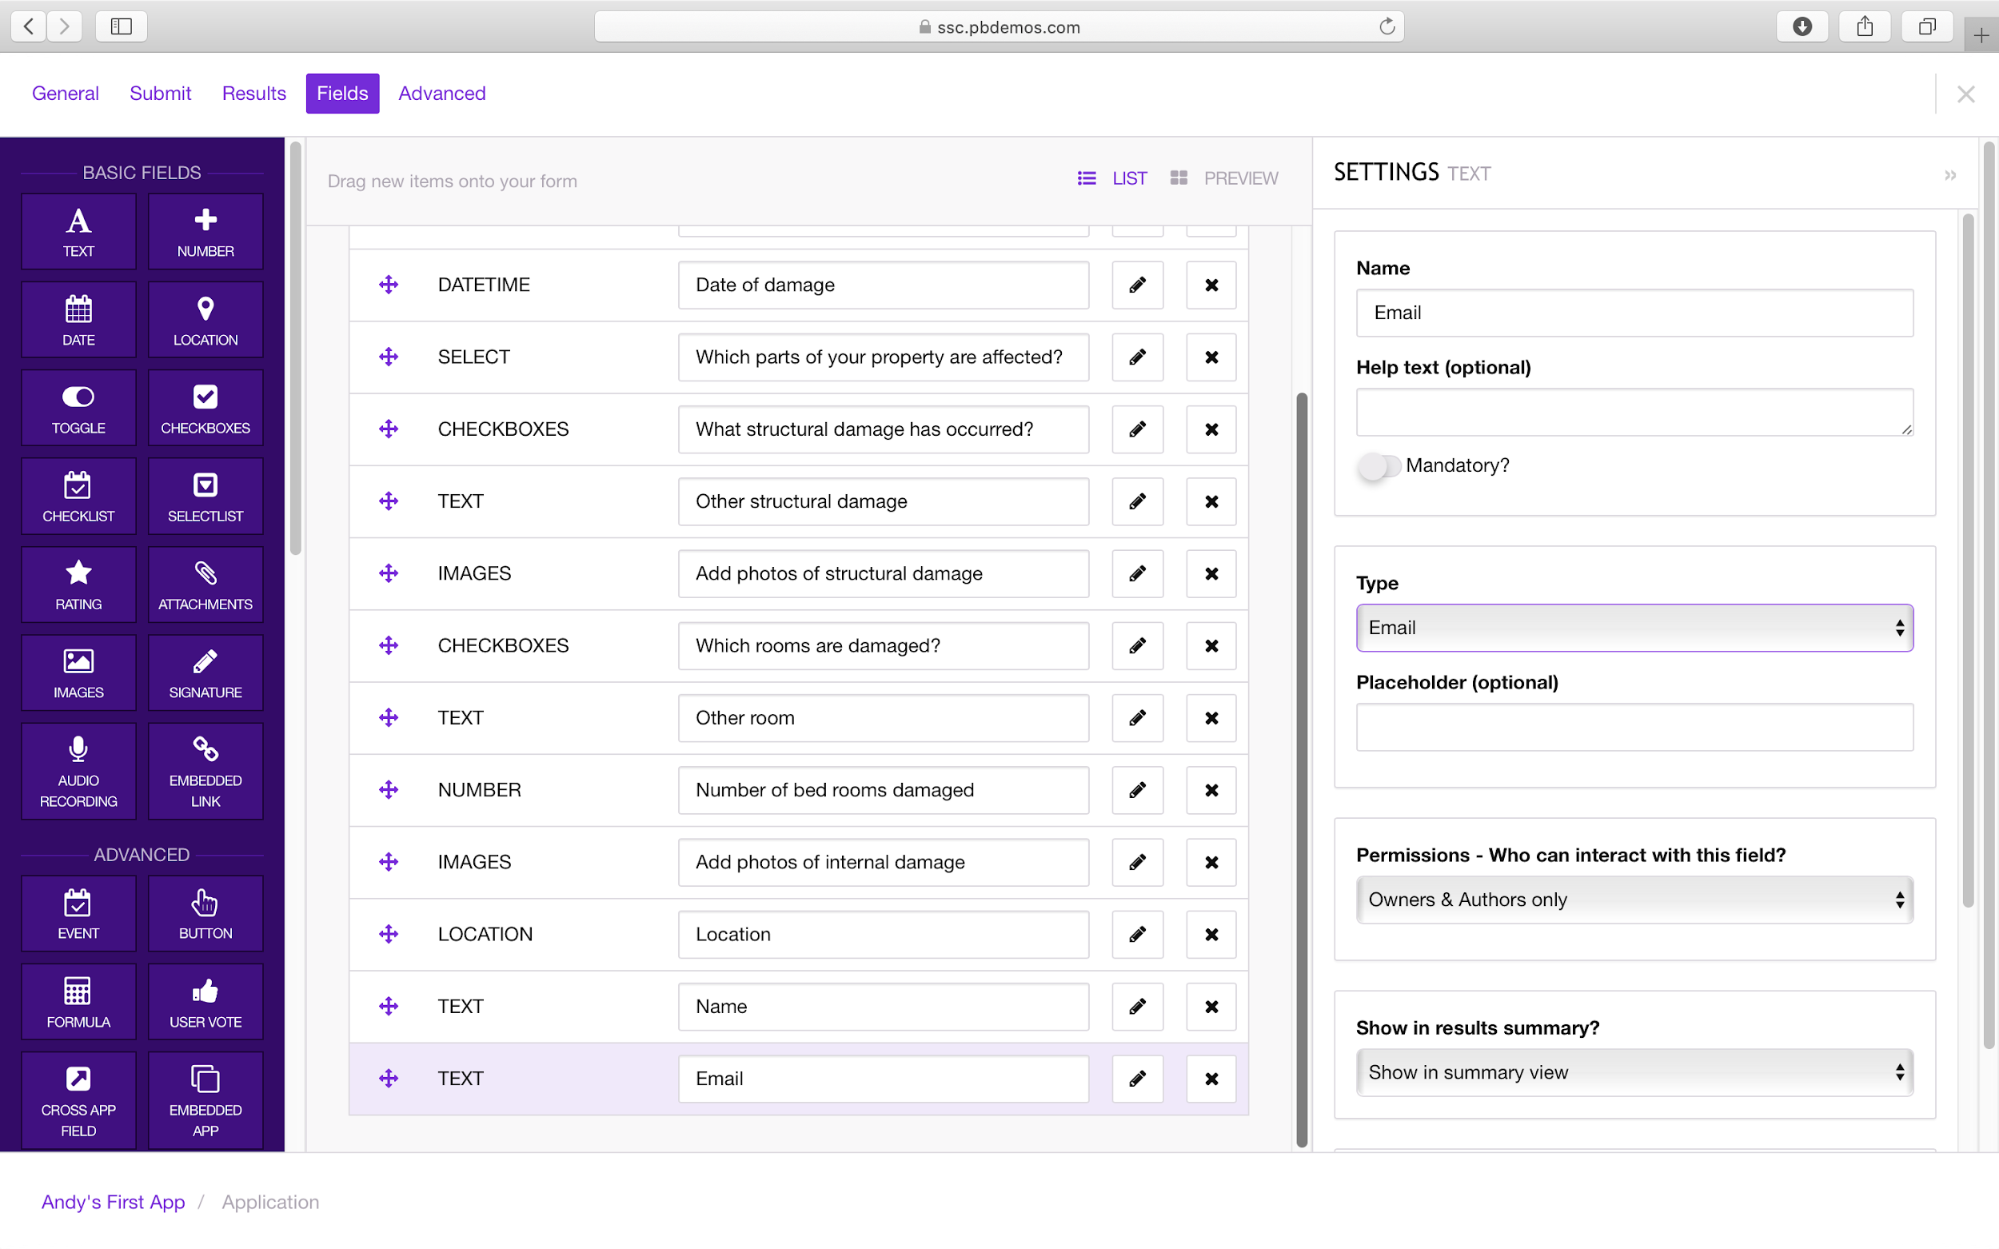
We will now add three Text fields, for Name, Email and Contact Number. The Name field should be plain text but select the appropriate type for Email and Contact Number, these check to ensure that the submitted information is correctly formatted.
 All of the fields are now in place for our App. Close the Fields tab using the X in the top right. You will now be presented with your app.
As you can see all the fields that you have added to the App are visible.
Part 2: Refining you App
Subdividing the App
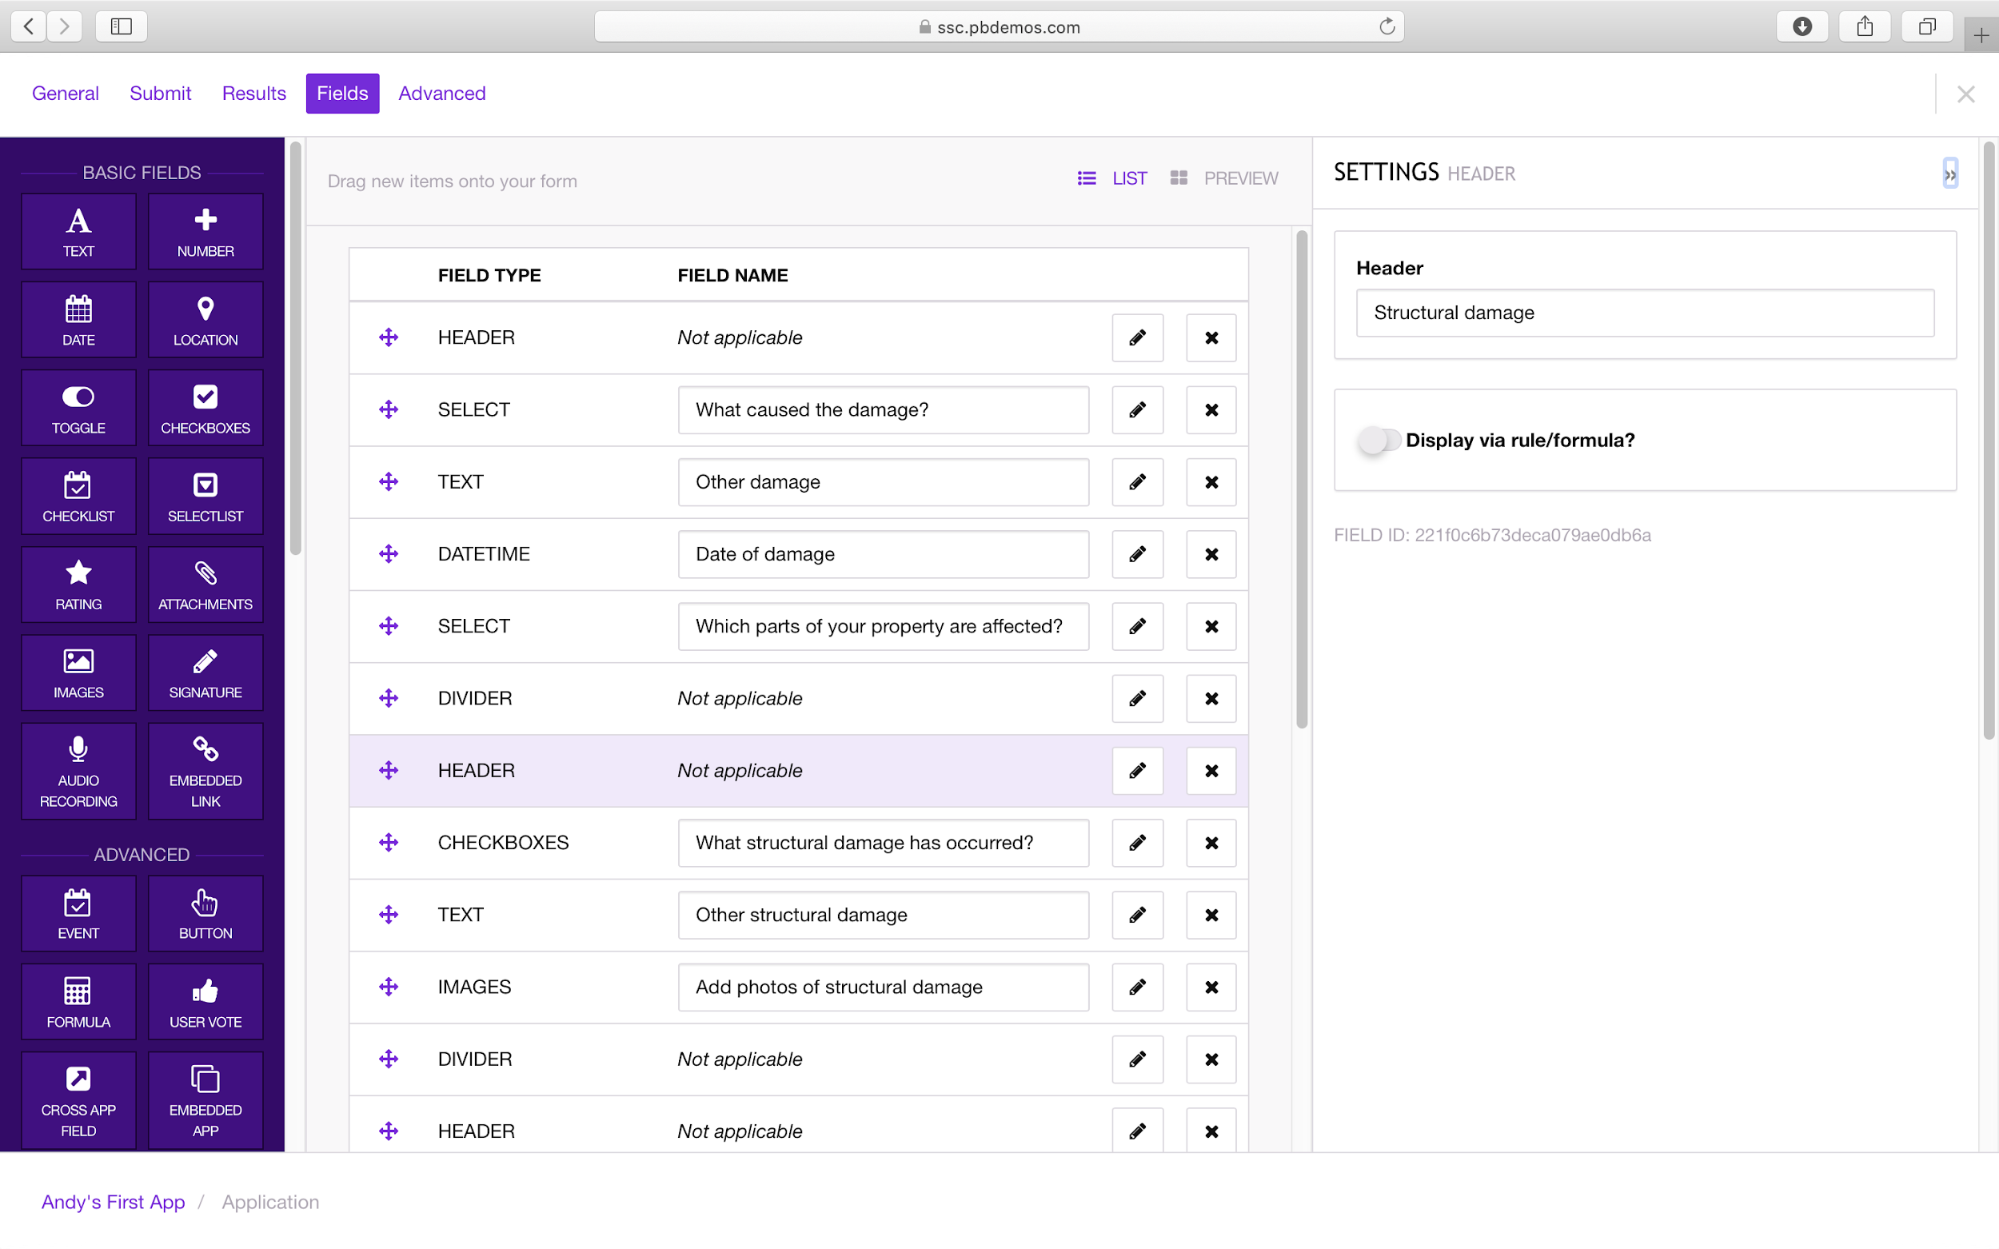
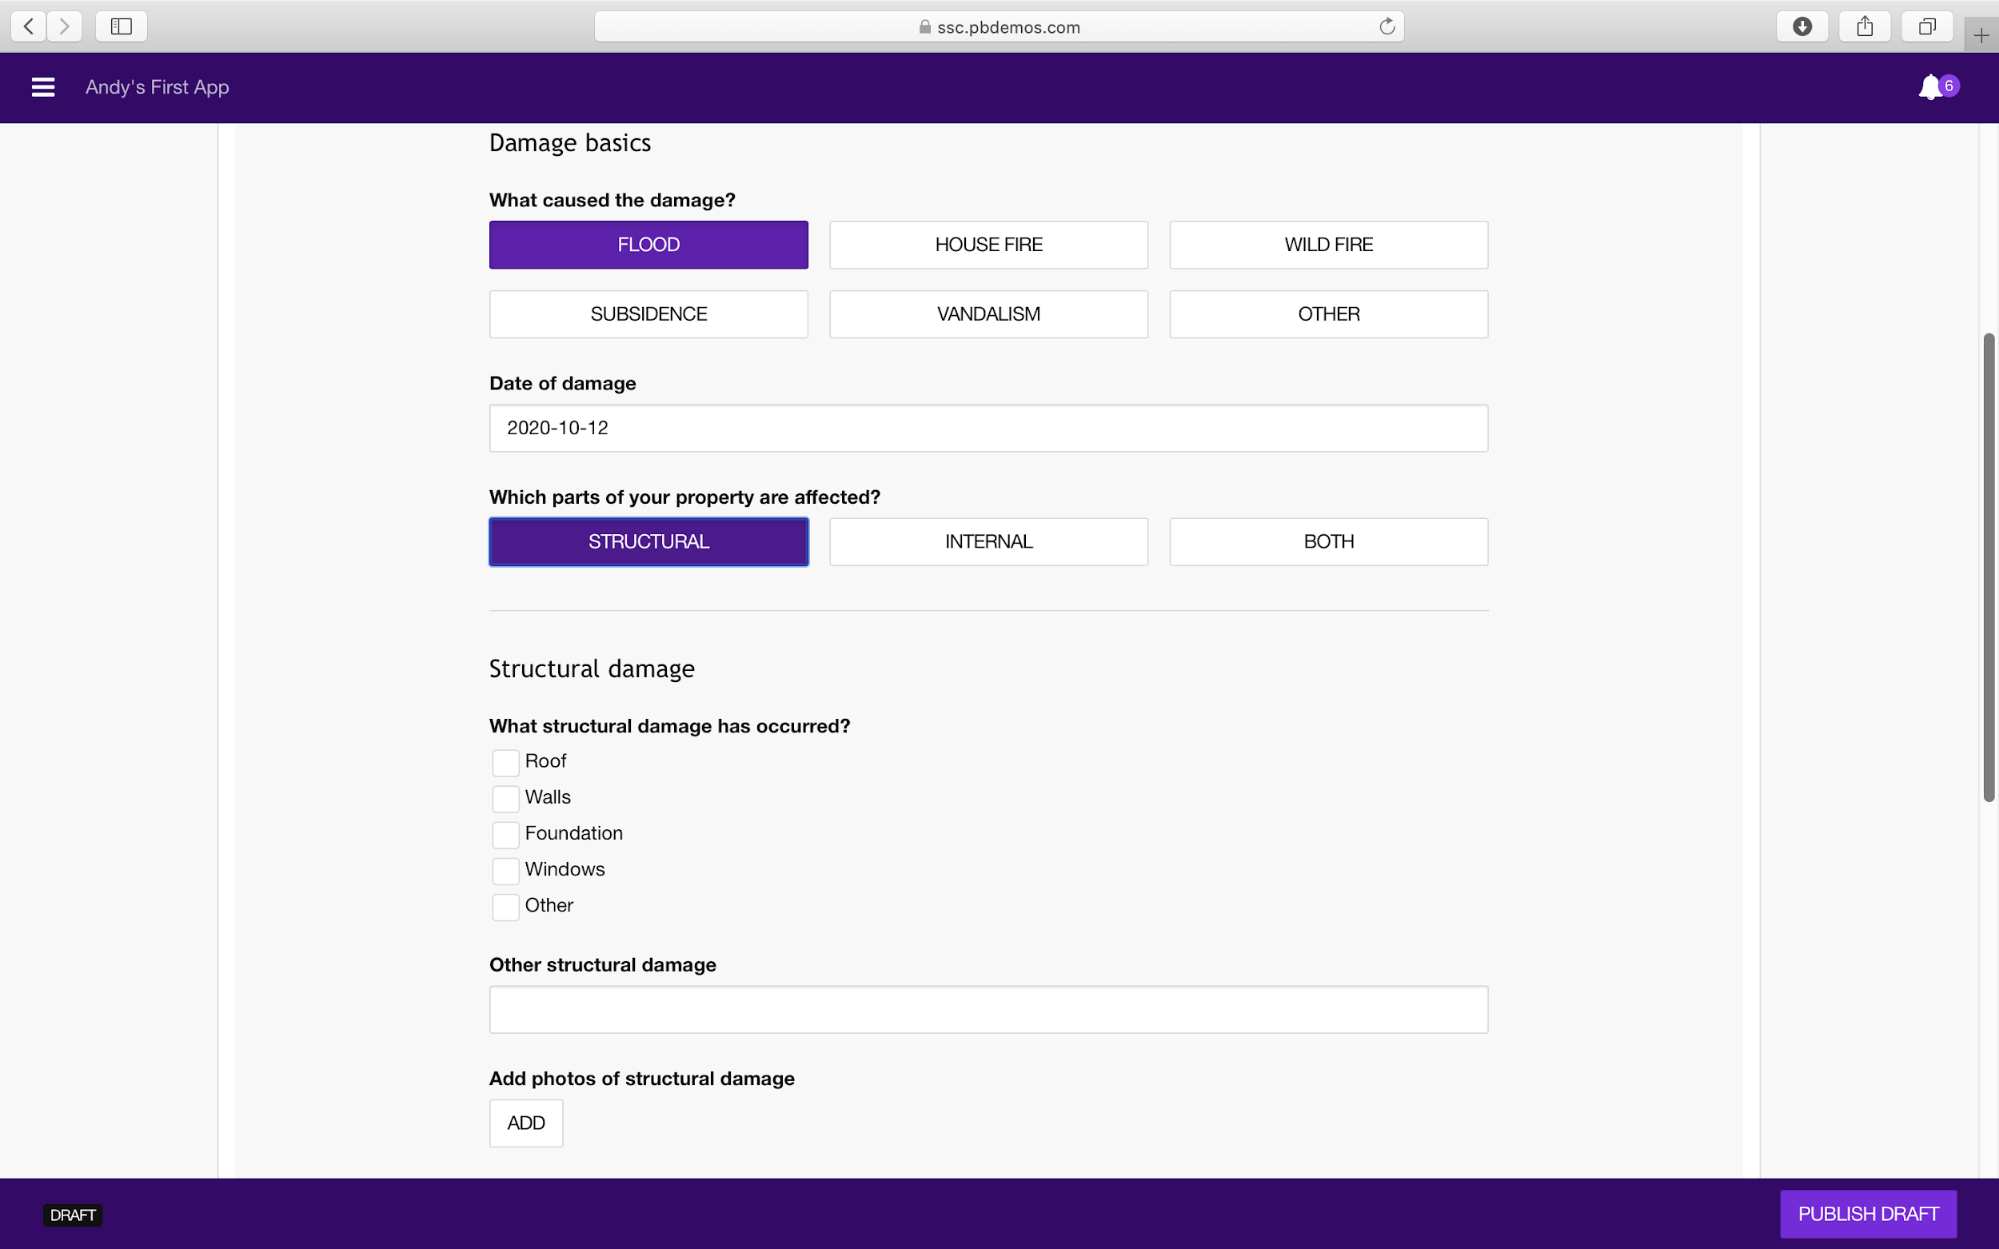
A simple way to make the app more attractive and user friendly is to subdivide it into different sections. The app builder provides simple tools to do this. Go back to the Fields page. Scroll down to the display fields. Drag a Header field onto the top of the canvas and in the header text box type Damage Basics.
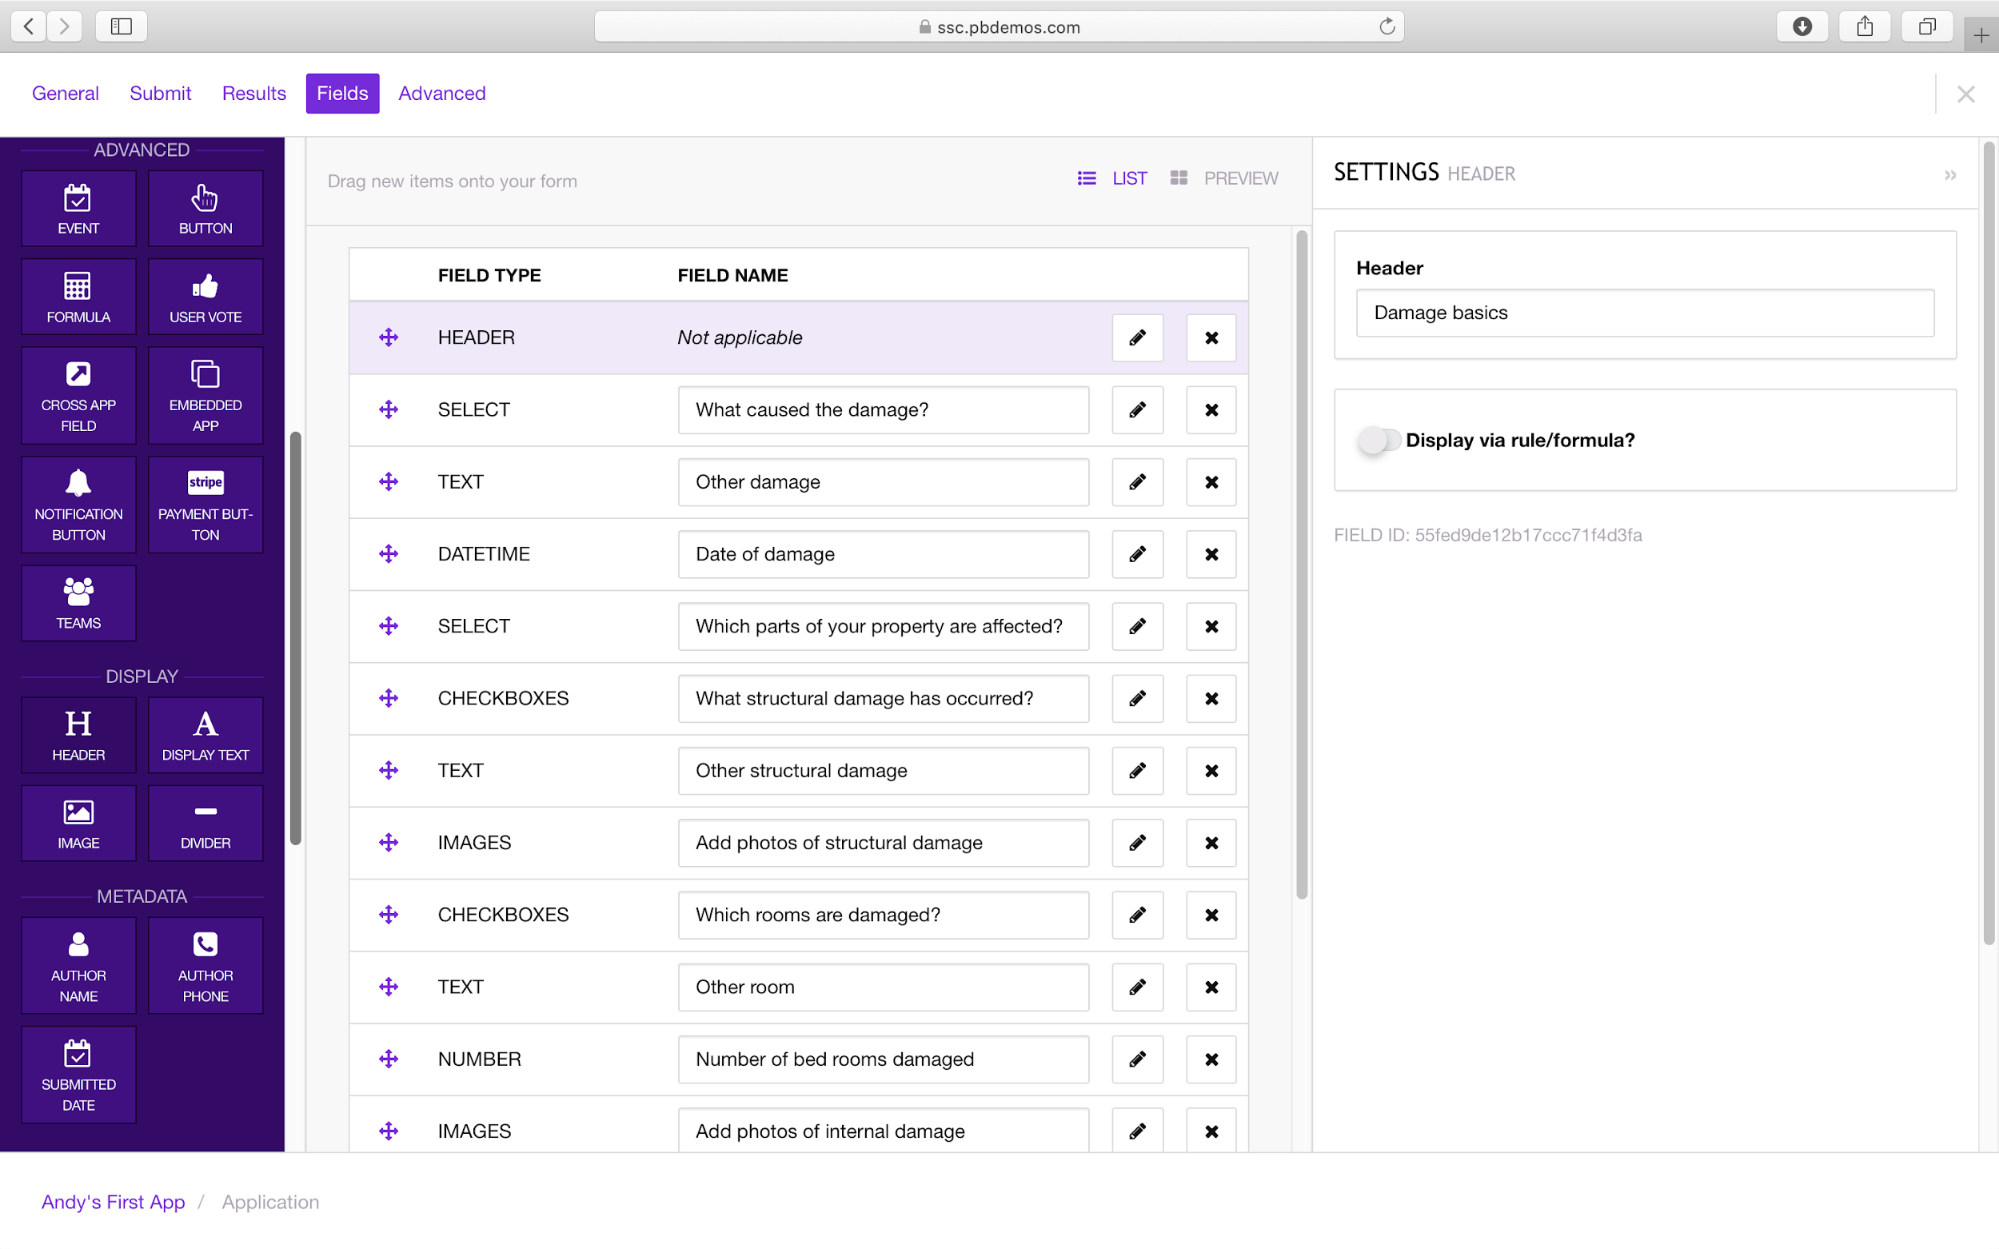
To complete this section, drag a Divider field below the Select field Which parts of your property are affected?, add another Header directly below the Divider and name it Structural damage. Following the first Image field add another Divider and a Header named Internal damage. A final Divider should be placed after the second Image field again followed by a Header named Contact details.
Close the Fields tab using the X. The App now looks more organised with appropriate sections.
Only Show Required Fields
The App as it stands shows all of the questions - some of which may not be applicable to the user. The App builder gives you the option to show or hide fields based on simple rules. Go back to the Fields tab. In the first question What caused the damage? If the user does not select Other why show the next question asking them to input what the other reason for the damage was.
Select the Text field Other damage. In the settings for this field scroll down to the Display via rule/formula? And toggle the button on. Then select Show and enter the Json rule `What caused the damage?` = ‘Other’. Ensure that the field is enclosed by forward ticks ` and the condition is enclosed with ‘ back ticks.
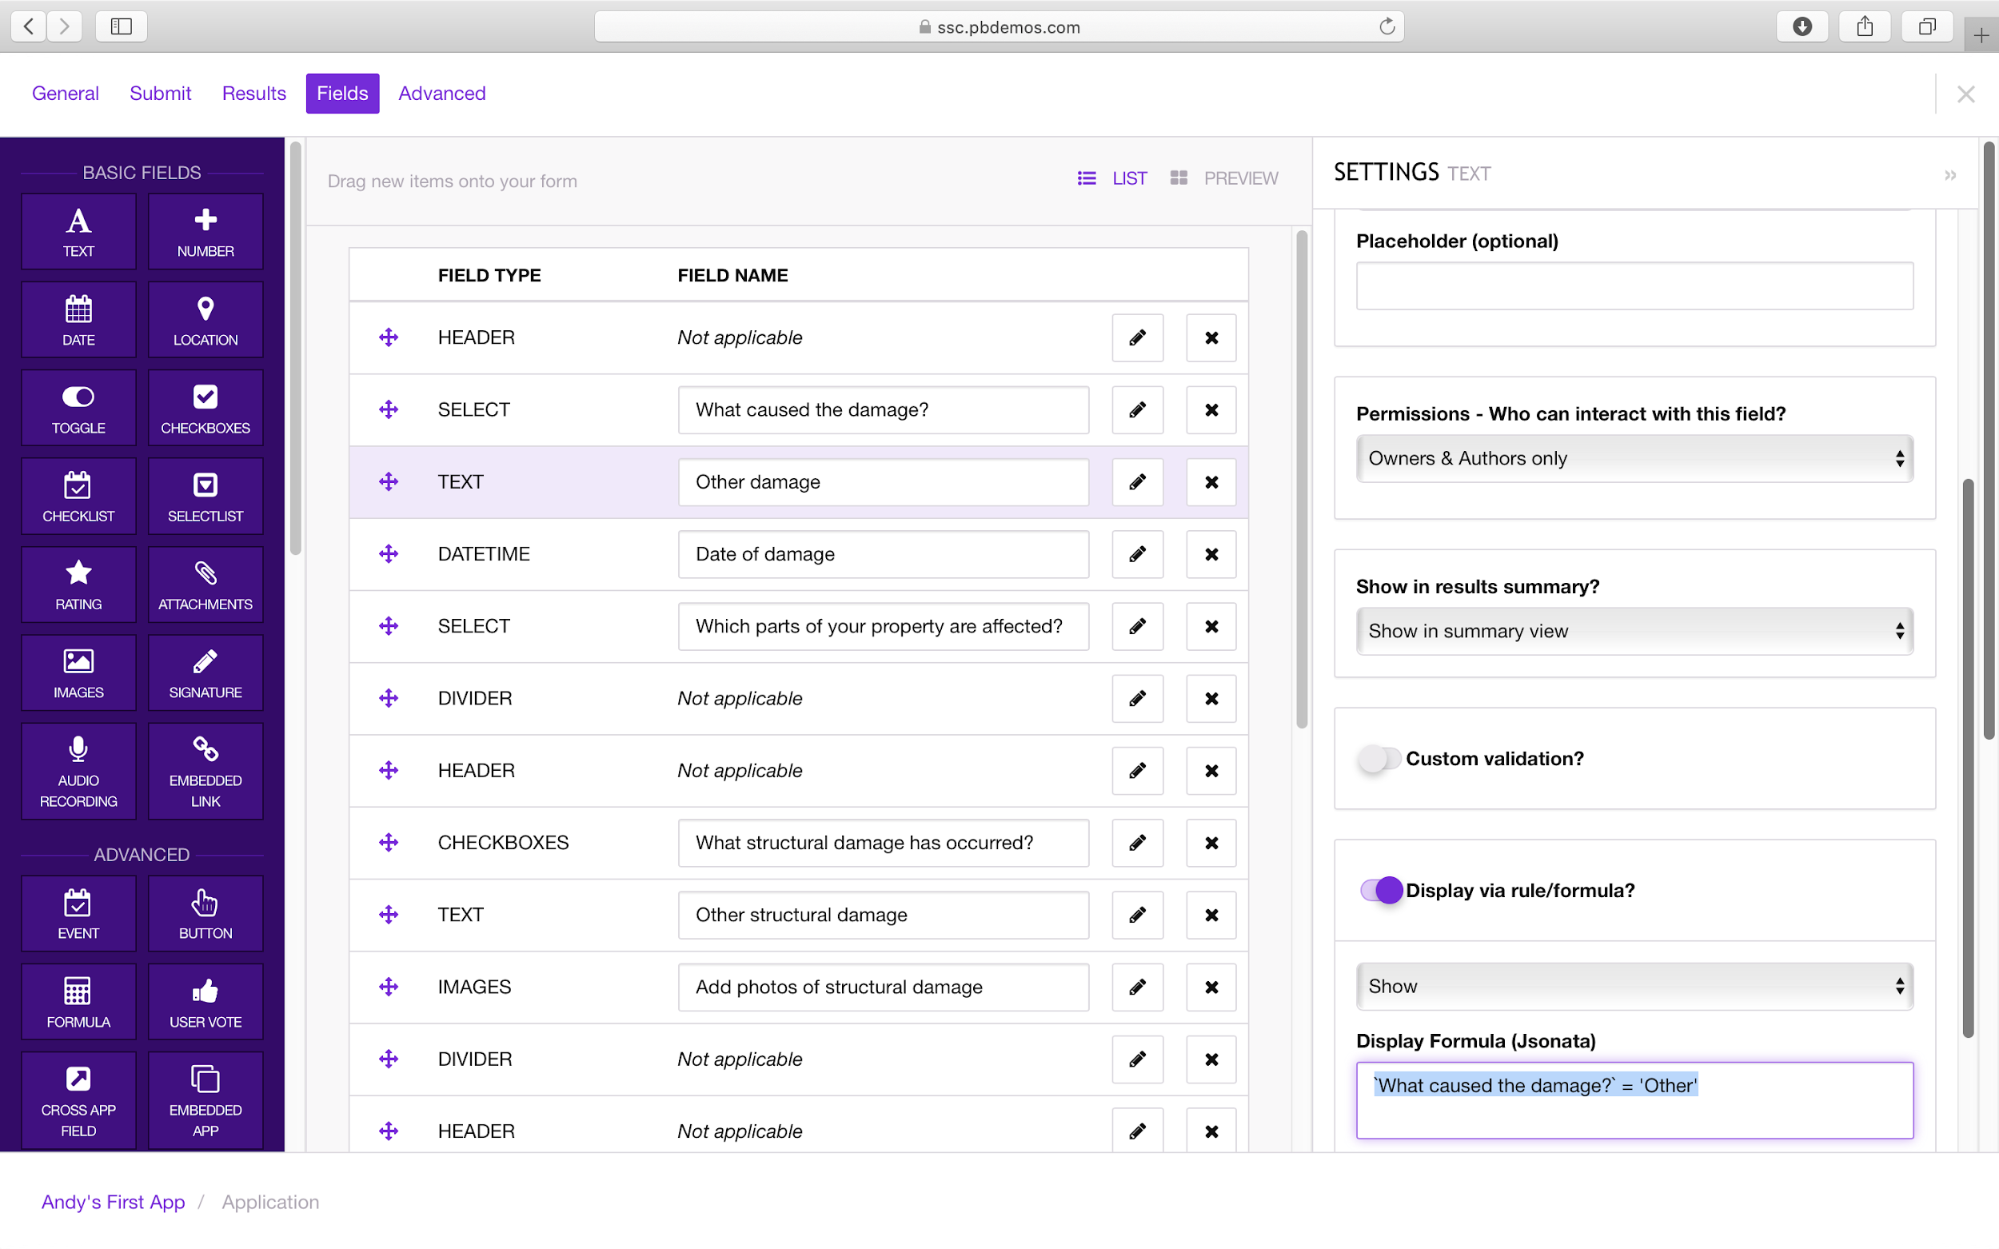 The rule means that the Other Text field will only be revealed if the user when answering the question What caused the damage? selected Other as their answer. If they select anything else the text box is not shown. The Show rule can be applied to some of the other fields.
The questions relating to Structural damage should be shown if the user selects Structural or Both from the Select list. The rule is slightly longer as it needs to account for two potential answers: `Which parts of your property are affected?` = ‘Structural’ or `Which parts of your property are affected?` = ‘Both’ . Type in the rule into the Divider field and apply Show. You can now copy this rule and paste it into the Header, CheckBox, Other and Image fields.
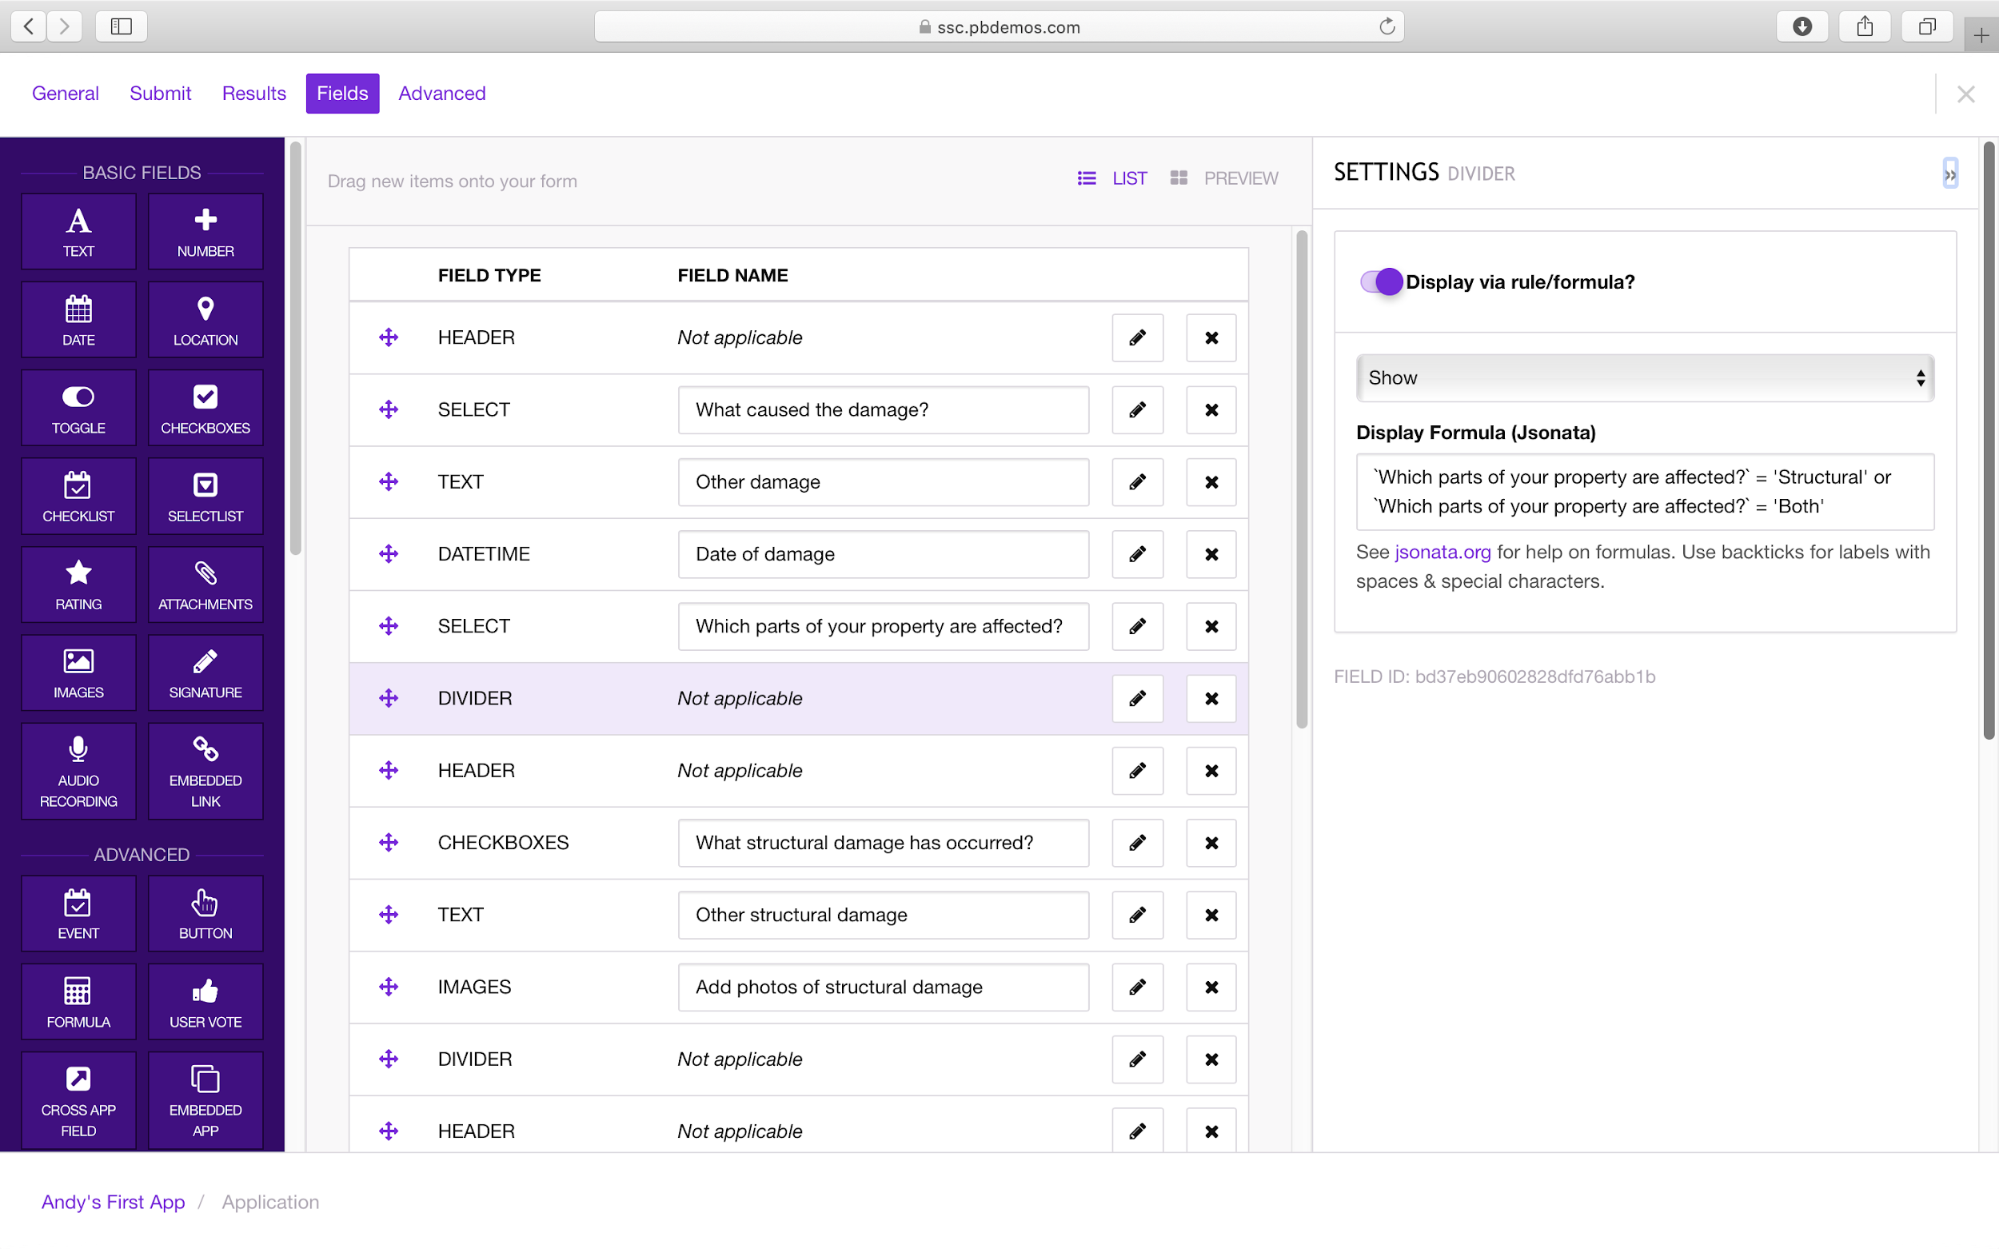 Slightly amending the rule to `Which parts of your property are affected?` = ‘Internal’ or `Which parts of your property are affected?` = ‘Both’ the rule can be applied to the fields from the Divider down to the second Image field.
Now when you look at the App it is easier to use, only revealing information that is required based upon the answers provided.
Making Fields Mandatory.
To ensure that essential data is collected by the App fields can be made mandatory. In this app we should make the Name, Email and Contact Number mandatory. Go back to the Fields page select the Text field Name and simply toggle the mandatory button. Repeat this for the other two fields.
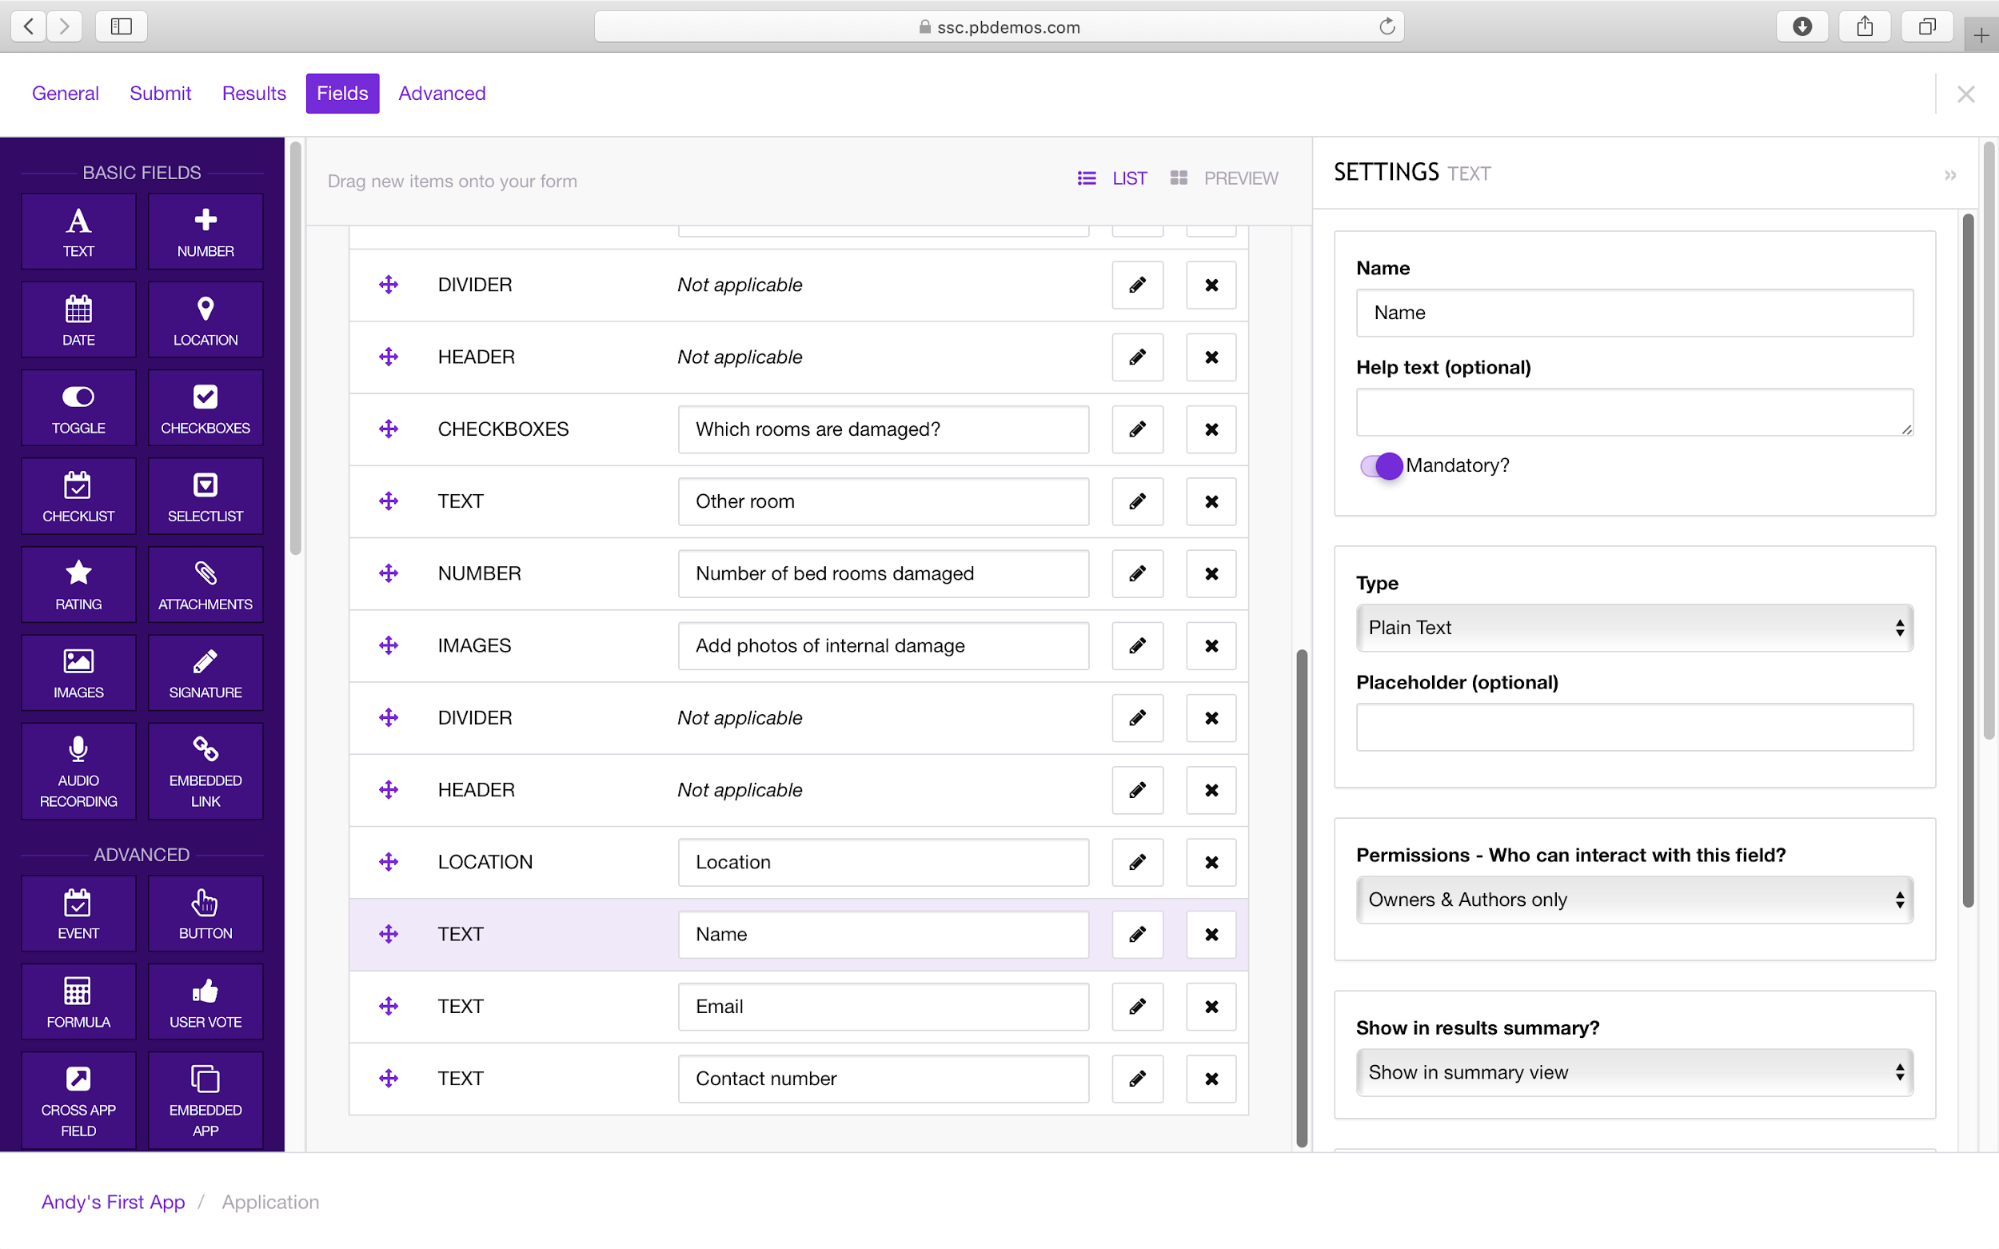 A user cannot submit a response to the App until mandatory fields are completed. Note: any field that is shown or hidden based on a rule cannot be Mandatory.
Adding a cover Image
Close the Properties window by clicking on the X. Click the three ellipses to the right of Following?, then select Settings. Scroll down so that you can see Cover Image and select ON.
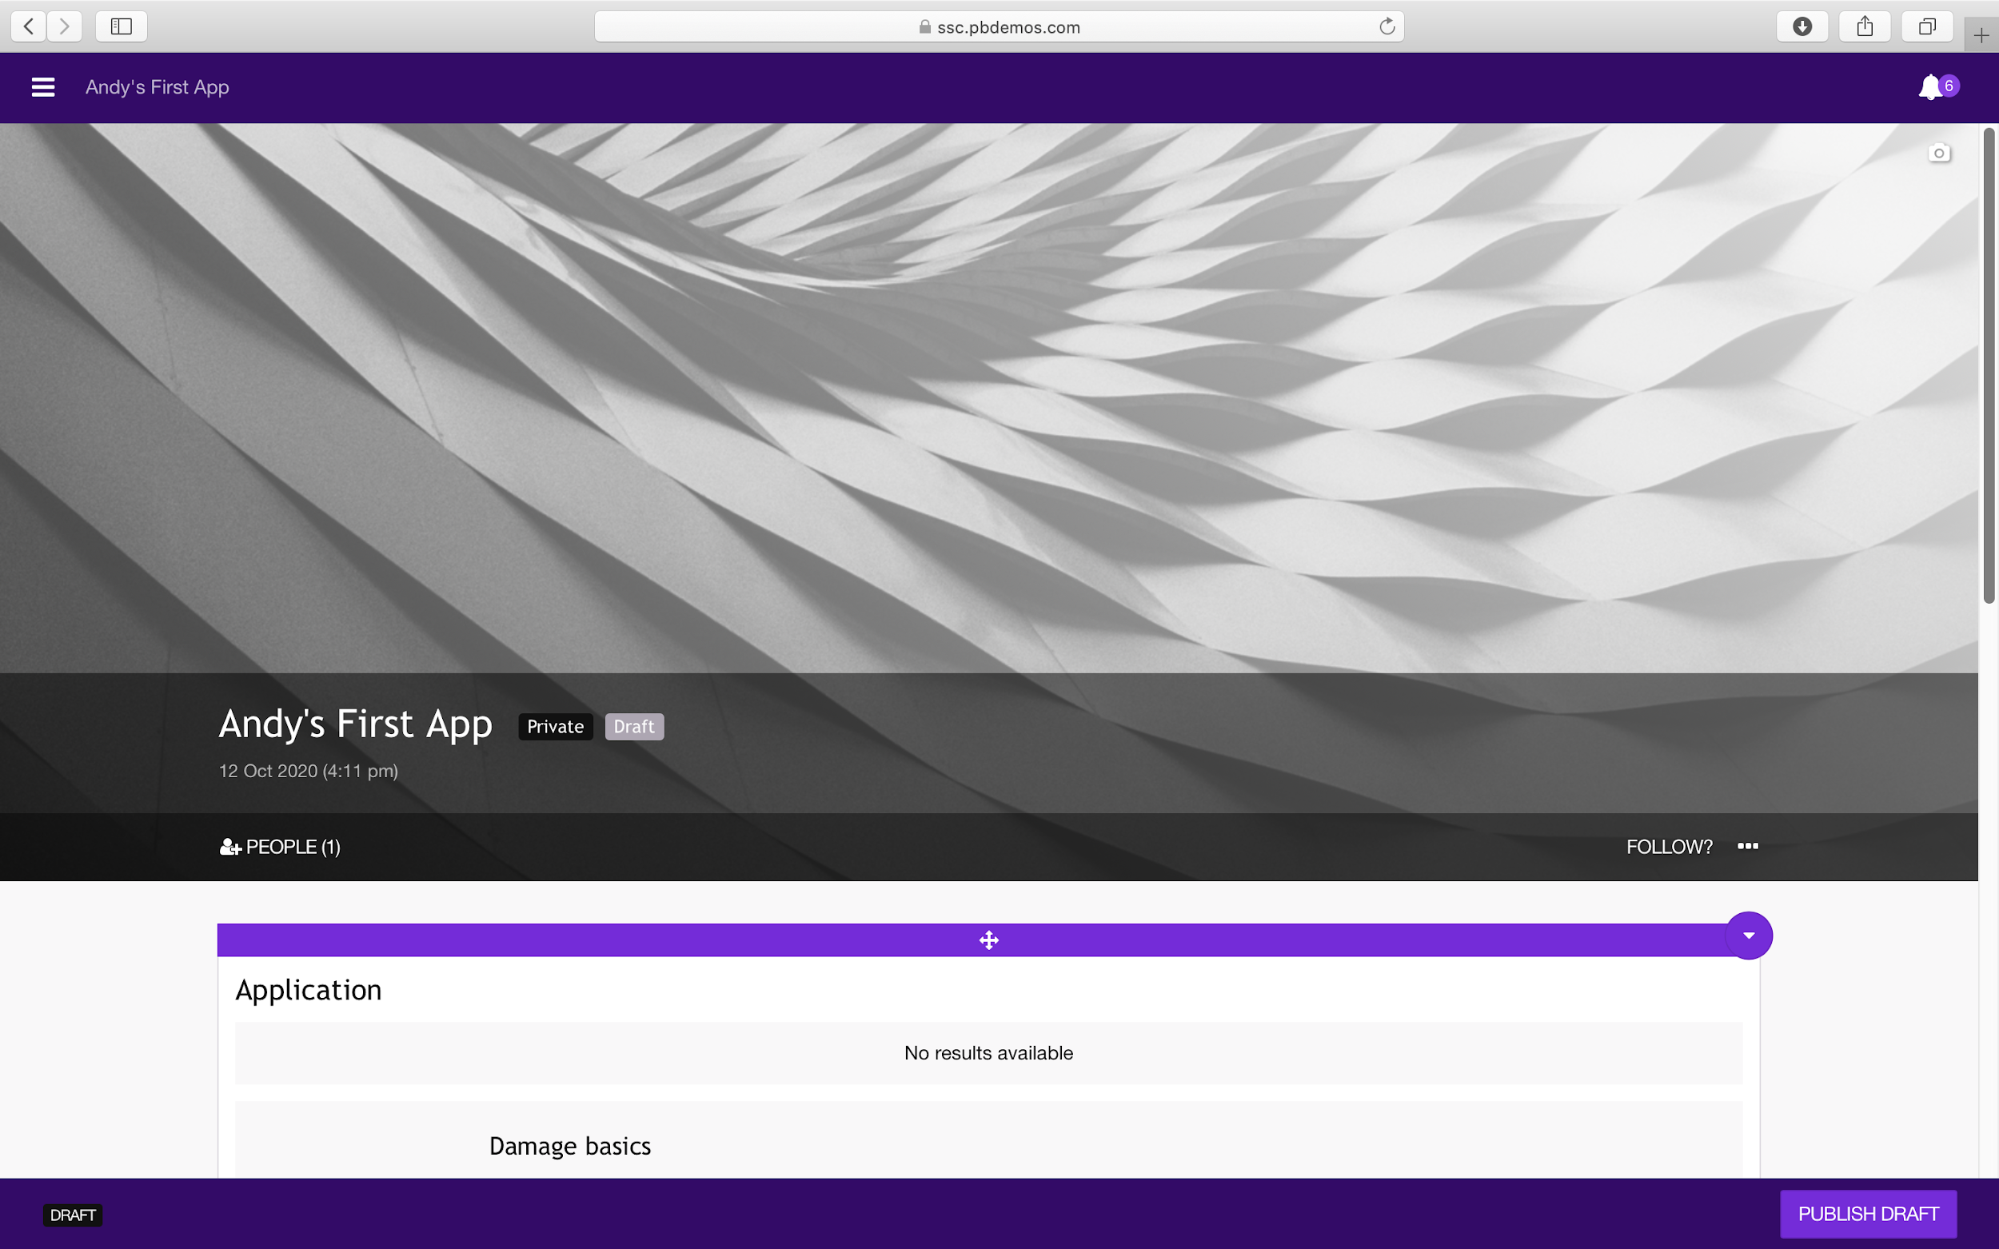 A standard cover image is inserted to add a more attractive cover click the Camera
  symbol in the top right.
Click on Select Unsplash Image then enter a search term for an appropriate image.