Azure AKS install guide
Table of contents
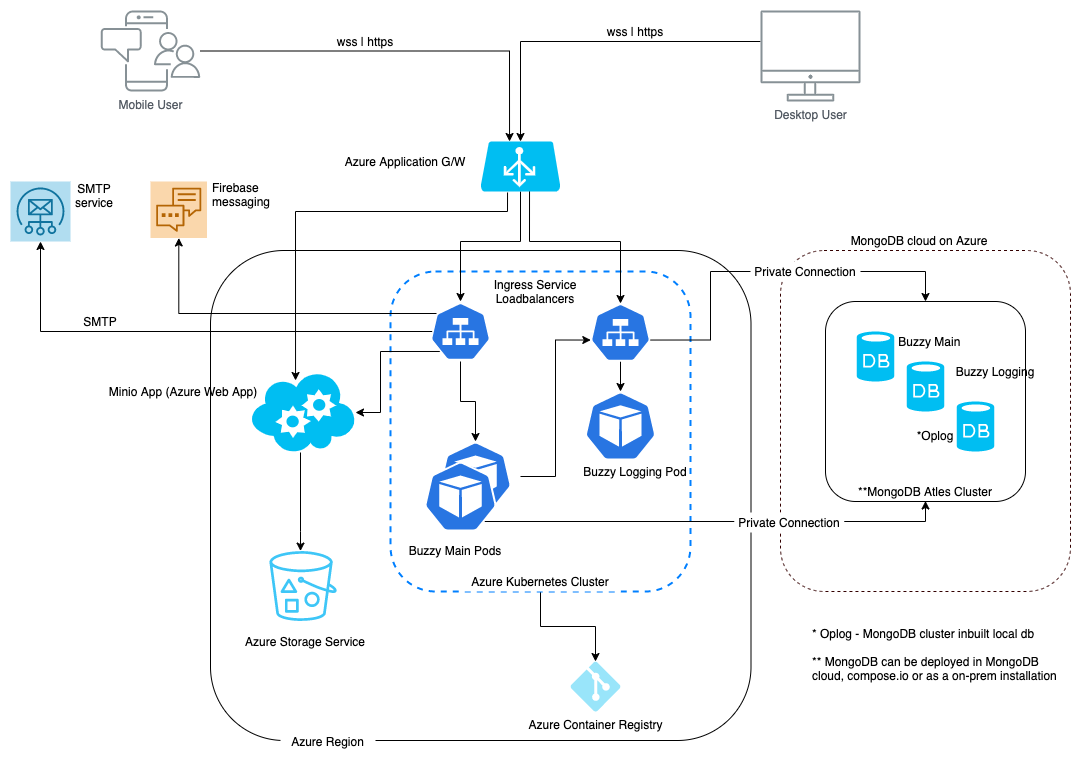
- Deployment architecture
- Prerequisites
- Container capacity
- Azure services used
- Blob storage containers
- Create S3 compatible storage gateway app
- Import Buzzy images into Azure container registry
- Deploy Azure Kubernetes Cluster
- Integrate ACR repositories into AKS service
- Buzzy main app deployment
- Buzzy Logging app deployment
- DNS and HTTPS
Deployment architecture
Prerequisites
- Azure CLI installed and access configured
- Docker installed locally and has access to Buzzy main and logging app image repositories (reach out Buzzy team for access to image repositories)
- Three MonogDB databases including oplog database
- Azure Storage Account - refer section 3 for deployment steps
- Azure Application Gateway
- Domain names and DNS for Buzzy main and logging apps
Container capacity
Minimum capacity for both Apps (Main and Logging) is 0.5 vCPU and 1 GB RAM. However, baseline capacity analysis and autoscaling rules are recommended.
Azure services used
- Azure Virtual Network.
- Azure Kubernetes Service (AKS).
- Azure Container Registry (ACR).
- Azure CLI & kubectl- manage Azure services & Kubernetes.
- Azure Storage Service.
- Azure Web Apps - to create an S3 compatible storage gateway.
- Azure DNS and Application Gateway.
Blob storage containers
Minio app is deployed as S3 compatible storage gateway to connect storages created in Azure cloud. As Buzzy application requires two S3 compatible storage buckets, let’s create two blob storage containers using Azure Storage Service.
Add an Azure storage account
As the initial step, you may add a new “Resource Group” if you wish to have a separate resource group in your Azure subscription. Click on the “Create a resource” button in Azure portal home page and then search for “Resource group” to add a new resource group. Make sure you use the same resource group for each resource creation performed under this deployment. Again, click on the “Create a resource” and search for “Storage account” to add a new Storage account.
Add CORS configuration
For the Storage account you created above, Add CORS configuration using “CORS” option under “Settings” and add the configuration as seen in the screen below: 
Add two blob storage containers and permissions
Click “Containers” in the Overview page of this storage account. And then add two blob containers with any given names.
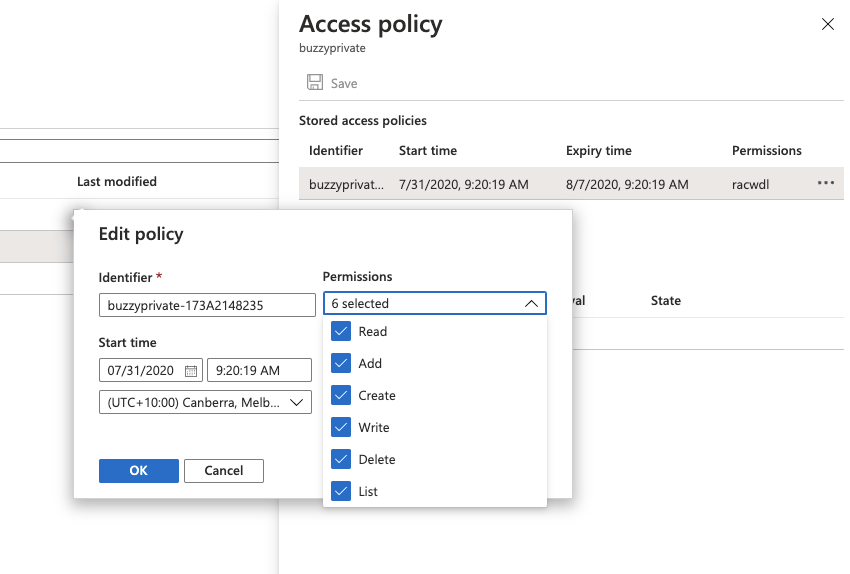
Add access to each storage container using access policies as seen in the screen below:
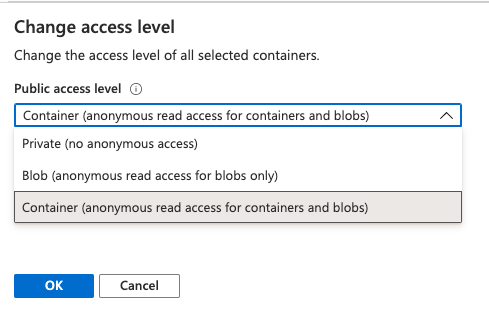
Configure one storage container for anonymous user read access. To grant an anonymous user read access for the nominated blob container, navigate to the Blob service and select the public container. Use “Change access level” option to open “Public access level” dropdown list. Select “Container (anonymous read access for containers and blobs)” and then click “OK” as seen in below:
Create S3 compatible storage gateway app
Now that you have created Azure storages above, continue to deploy the Minio S3 compatible app in Azure App services using the below quick reference guide. Minio app performs as a storage gateway between Buzzy apps and two storage containers created. Refer to Minio app deployment guide and note down S3 endpoint, Access Key and Secret Key after completing the Minio app deployment. These three values will be required by Kubernetes YML deployment performed in below sections.
Import Buzzy images into Azure container registry
This deployment uses Azure Container Registry (ACR) as the private container registry storing image repositories for Buzzy main and logging apps. It is also possible to directly pull images into Kubernetes nodes by importing your Docker Hub credentials (refer to Kubernetes documentation).
Deploy and Attach Azure Container Registry (ACR)
This deployment can be done via the Azure portal or Azure CLI.
Using Azure portal;
a. Click “Create a resource” button and search for “Container Registry”.
b. Click the “Create” button and follow the wizard to complete the registry creation using the same resource group created previously.
Refer Azure tutorial to create an ACR using Azure CLI.
c. Login to Azure Container Registry and integrate with AKS using below command.
az aks update -n myAKSCluster -g myResourceGroup --attach-acr <acr-name>
Import Buzzy images to ACR repositories
Complete this step to import two images from Docker hub’s Buzzy image repositories shared with you by Buzzy team.
Run this command using Azure CLI to import Bussy main app image:
$ az acr import \
  --name buzzymain_registry \
  --source docker.io/buzzybuzz/buzzy-main:latest \
  --image buzzy_main:latest \
  --username <docker id> \
  --password <docker password>

Run this command to import Buzzy logging app image:
$ az acr import \
  --name buzzylogging_registry \
  --source docker.io/buzzybuzz/buzzy-logging:latest \
  --image buzzy_logging:latest \
  --username <docker id> \
  --password <docker password>
Refer to Azure documentation for image import instructions.
Deploy Azure Kubernetes Cluster
Azure Kubernetes Cluster is deployed using Azure Kubernetes Service. Login to Azure portal and click “Create a resource” button and then search for Kubernetes Service. You will be given options to select the resource group, node pool and node size during the deployment wizard depending on your availability, scalability and capacity requirements. This deployment enables load balancing service by default. Refer to Azure documentation for Kubernetes cluster deployment.
Integrate ACR repositories into AKS service
Once Kubernetes cluster deployment is completed, two container image repositories created previously have to be integrated prior to application deployment. Run this command using Azure CLI to integrate the registry:
$ az aks update -n your-cluster-name -g your-resource-group –attach-acr your-buzzy-acr-name
Refer to Azure documentation for container repository integration.
Buzzy main app deployment
You may refer to the sample Buzzy main app YML file below and make changes according to your deployment specifications and AKS cluster configurations. Make sure to change server domain names, URLs and other object/service names according to your own values.
Run following Kubectl command (kubectl is already installed when you installed Azure CLI):
Refer to CheatSheet for kubectl command help.
$ kubectl create -f name-of-yml-file.yml
You might need to run this delete command, and then re run the create command if any errors received:
$ kubectl delete -f name-of-yml-file.yml
Run this command to review the status of Buzzy main app’s pod deployment progress:
$ kubectl get pods --all-namespaces
Run this command to get load balancer IP address:
$ kubectl get services
Or for detailed output:
$ kubectl describe services
Sample Buzzy main app YML file:
---
apiVersion: apps/v1
kind: Deployment
metadata:
 name: buzzy-app
spec:
 replicas: 1
 minReadySeconds: 10
 revisionHistoryLimit: 1
 selector:
   matchLabels:
     app: buzzy-app
 strategy:
   rollingUpdate:
     maxUnavailable: 0
     maxSurge: 1
 template:
   metadata:
     labels:
       app: buzzy-app
   spec:
     nodeSelector:
       "beta.kubernetes.io/os": linux
     containers:
       - name: buzzy-app-container
         image: buzzy-main.azurecr.io/buzzy-main:latest
         imagePullPolicy: Always
         ports:
           - containerPort: 8080
             protocol: TCP
         env:
           - name: PORT
             value: "8080"
            - name: ROOT_URL
              value: "https://main-app.buzzy.net"
            - name: LOG_TO_STDOUT
              value: "1"
            - name: MONGO_URL
              value:  "mongodb+srv://<username>:<password>@bzy.yvxxx.azure.mongodb.net/<db name>?retryWrites=true&w=majority"
            - name: MONGO_OPLOG_URL
              value: "mongodb+srv://<username>:<password>@bzy.yvxxx.azure.mongodb.net/local?retryWrites=true&w=majority"
            - name: METEOR_SETTINGS
              value: '{
                "jwtSecret": "change-to-some-very-long-secret-string",
                "REPORT_ABUSE_EMAILS": ["someadminemail@emails.email"],
                "AWS_BUZZY_FILES": {
                  "enabled": true,
                  "accessKeyId": "your access key id",
                  "secretAccessKey": "your secret key",
                  "endpoint": "https://minio-app.buzzy.net"
                },
                "MAIL_URL": "smtp://someuser:somepassword@smtp.sendgrid.net:587",
                "BUZZY_ADMIN_EMAIL": "someadminemail",
                "DEFAULT_OAUTH_PROVIDERS": {
                 "defaultOrganizationName": "Organisation name",
                 "providers": [

                 ]
               },
              "BUZZY_ADMIN_IDS": ["adminuserid"],
                "BUZZY_LOGGING_TOKEN": "somelongtoken",
                "BUZZY_ADMIN_TOKEN": "somelongtoken",
                "BUZZY_CREATE_DEFAULT_ACCOUNTS": {
                 "enabled": true,
                "accounts": [
                    {
                      "email": "someone@test.com",
                      "password": "somepassword",
                      "isAdmin": true
                    }
                  ]
                },
                "public": {
                  "AWS_BUZZY_FILES": {
                    "enabled": true,
                    "S3FileExpiry": 604800,
                    "BUCKET_NAME": "buzzy-files",
                    "PUBLIC_BUCKET_NAME": "buzzy-files-public",
                    "s3ForcePathStyle": true,
                    "URL_PATTERN": "https://minio.buzzy.net/buzzy-files"
                  },
                 "BUZZY_CUSTOM": {
                   "NAME": "Organization Name",
                   "APP_URL_IOS": "",
                   "APP_URL_ANDROID": "",
                   "LOGO_MAIN": "",
                   "LOGO_MAIL": "",
                   "LOGO_MAIL_WIDTH": "60",
                   "LOGO_MAIL_HEIGHT": "25",
                   "EMAIL_FOOTER": "",
                   "PROMO": "",
                   "PROMO_URL": "",
                   "SPLASH_IMAGE": "",
                   "WELCOME_IMAGE": ""
                 },
                 "BUZZY_PROVIDERS": [

                 ],
                 "BUZZY_LOGGING_SERVER": "https://logging-app.buzzy.net",
                 "BUZZY_TEMPLATE_SERVER": "http://a.buzzy.buzz",
                 "BUZZY_VERSION": "3.0.1"
               }
             }'
---

apiVersion: v1
kind: Service
metadata:
 name: buzzy-service
spec:
 type: LoadBalancer
 ports:
   - port: 80
     targetPort: 8080
     name: http
     protocol: TCP
 selector:
   app: buzzy-app
Buzzy Logging app deployment
Refer to sample Buzzy logging app YML file below and make changes according to your deployment specifications and AKS cluster configurations. Make sure to change server domain names, URLs and other object/service names according to your own values.
Run following Kubectl command ( Kubectl is already installed when you installed Azure CLI):
Refer to CheatSheet for kubectl command help.
$ kubectl create -f name-of-yml-file.yml
Run this command to review the status of Buzzy logging app’s pod deployment progress:
$ kubectl get pods --all-namespaces
Run this command to get load balancer IP address:
$ kubectl get services
Or for detailed output:
$ kubectl describe services
Sample Buzzy logging app YML file:
---
apiVersion: apps/v1
kind: Deployment
metadata:
  name: buzzy-logging
spec:
  replicas: 1
  minReadySeconds: 10
  revisionHistoryLimit: 1
  selector:
    matchLabels:
      app: buzzy-logging
  strategy:
    rollingUpdate:
      maxUnavailable: 0
      maxSurge: 1
  template:
    metadata:
      labels:
        app: buzzy-logging
    spec:
    nodeSelector:
        "beta.kubernetes.io/os": linux
      containers:
        - name: buzzy-app-container
          image: buzzy-logging.azurecr.io/buzzy-logging:latest
          imagePullPolicy: Always
          ports:
            - containerPort: 8080
              protocol: TCP
          env:
            - name: PORT
              value: "8080"
            - name: ROOT_URL
              value: "https://logging-app.buzzy.net"
            - name: LOG_TO_STDOUT
              value: "1"
            - name: MONGO_URL
              value:  "value:  "mongodb+srv://<username>:<password>@bzy.yvxxx.azure.mongodb.net/<db name>?retryWrites=true&w=majority""
            - name: MONGO_OPLOG_URL
              value: "value:  "mongodb+srv://<username>:<password>@bzy.yvxxx.azure.mongodb.net/local?retryWrites=true&w=majority""
            - name: METEOR_SETTINGS
              value: '{
                "BUZZY_LOGGING_TOKEN": "somelongtoken",
                "public": {
                  "BUZZY_LOGGING_SERVER": "https://logging-app.buzzy.net",
                  "BUZZY_APP_SERVER": "https://main-app.buzzy.net"
                }
              }'

---
apiVersion: v1
kind: Service
metadata:
  name: buzzy-logging
spec:
  type: NodePort
  selector:
    app: buzzy-logging
  ports:
    - port: 80
      targetPort: 8080
      name: http
      protocol: TCP
DNS and HTTPS
DNS management
You can use Azure DNS or any third-party DNS tools to manage DNS records to resolve load balancer IPs for both app services.
Load balancer with HTTPS
The standard default load balancer created by AKS is a layer 4 load balancing and doesn’t support SSL offloading. To achieve this you may have to deploy an ingress controller that will direct from the routing rules on an external Application Gateway based on ingress rules. The following options can be implemented for a production grade deployment.
NGINX Ingress controller with cert-manager to generate your certificate. Refer to Azure documentation.
Application Gateway to manage your own routing rule that will point to the default layer 4 load balancer created by AKS. Refer to Azure documentation.